Introduction
TouchOSC is a modular control surface toolkit for designing and constructing custom controllers that can be used on a multitude of operating systems and devices.
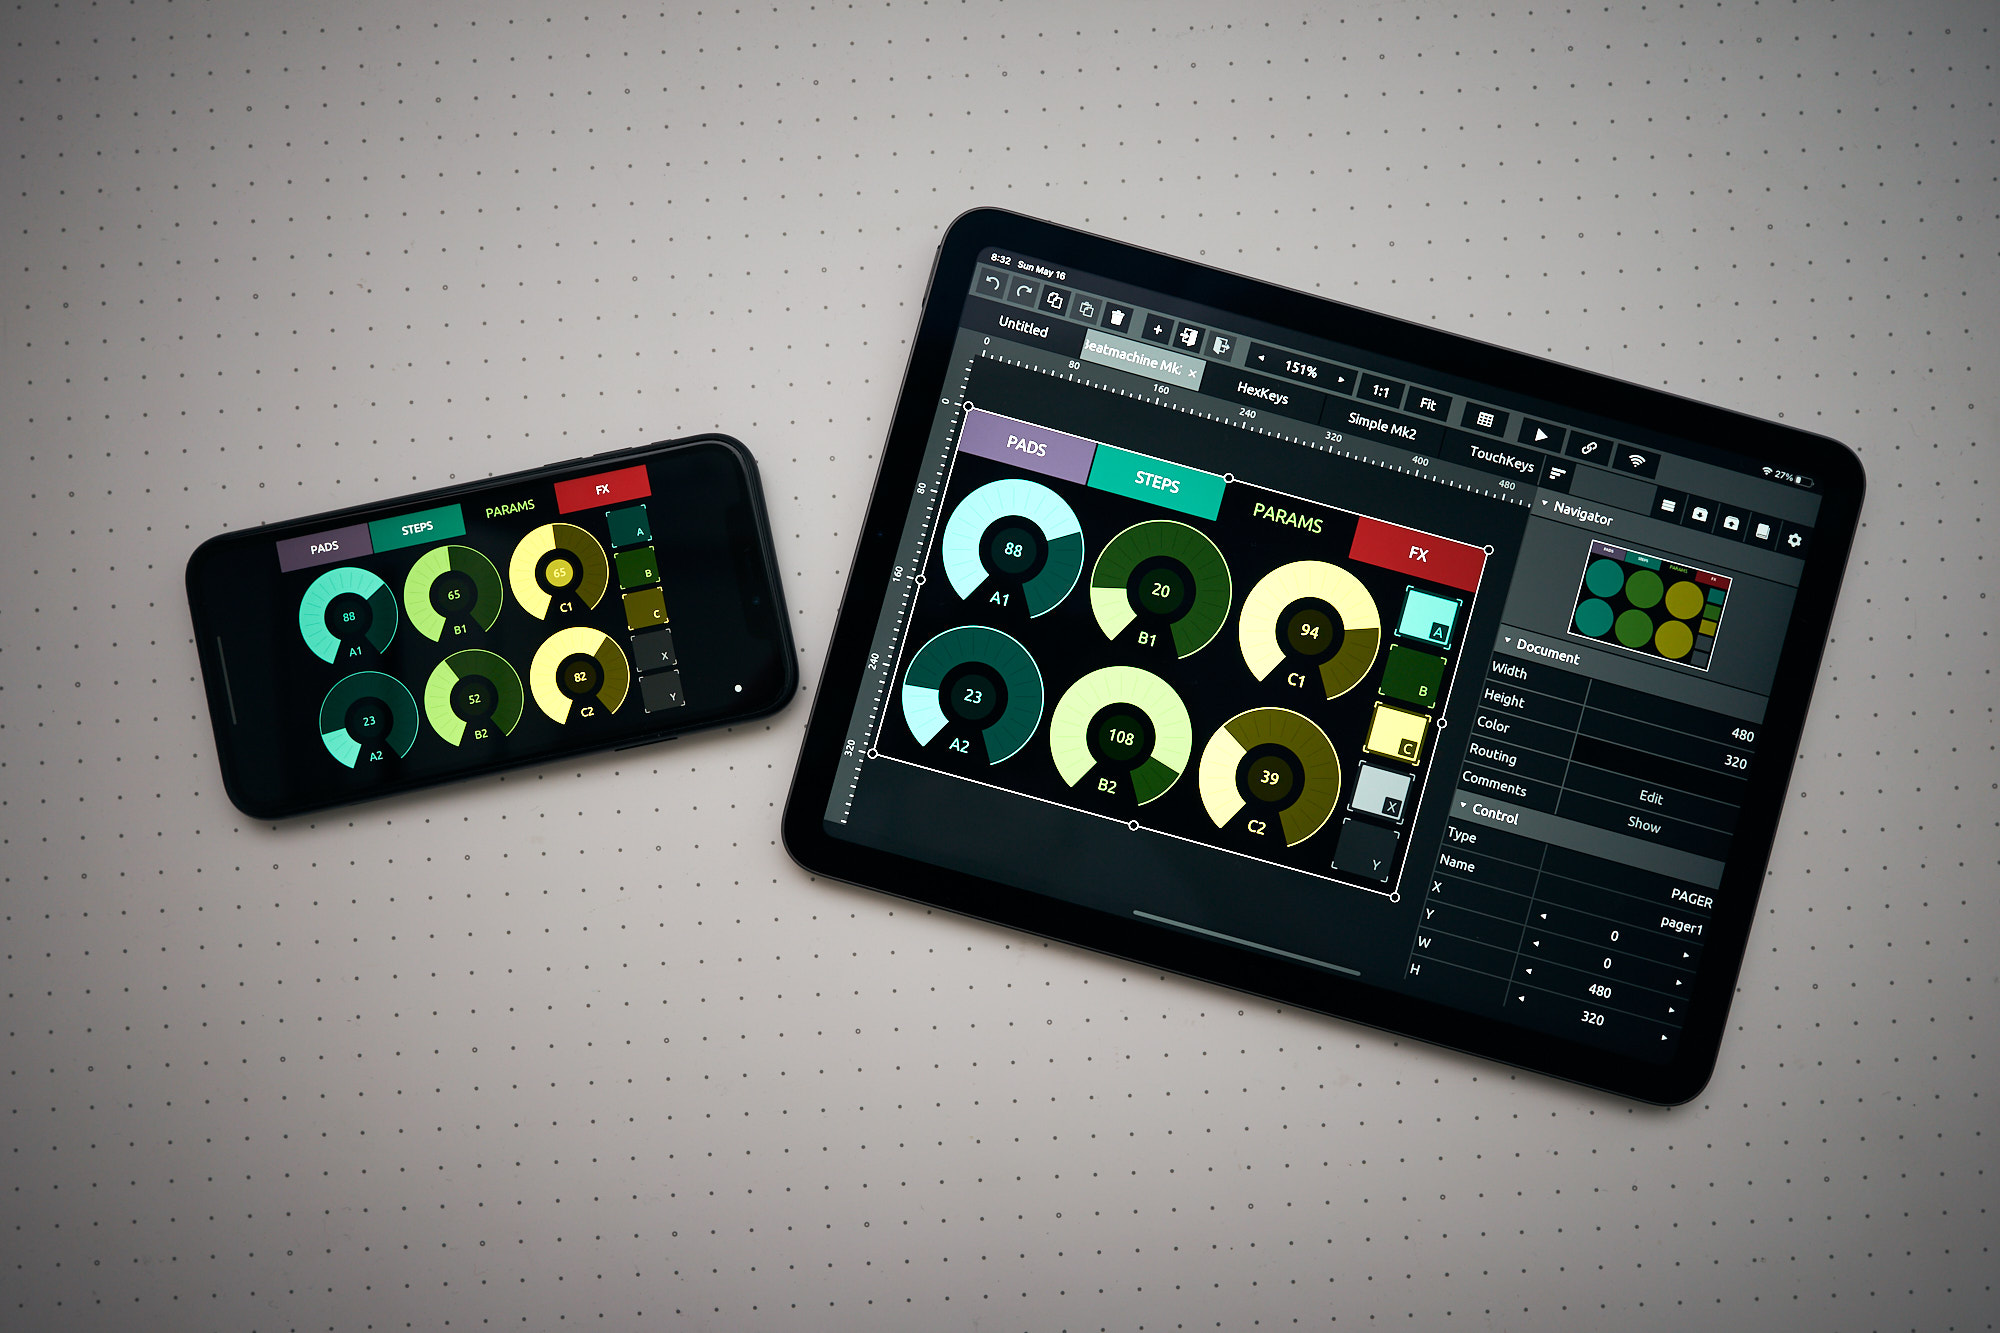
TouchOSC can be used on touch-screen mobile devices as well as desktop operating systems using traditional input methods.
TouchOSC can communicate with other software and hardware using the MIDI and Open Sound Control protocols in a variety of ways and via many different types of wired and wireless connections simultaneously.
All versions of TouchOSC include the powerful, integrated editor, to customize every detail of your controller setup. If the default behavior of the selection of available controls does not exactly do as you wish, there is unlimited possibilities using the deep scripting engine and the easily configured inter-control communication using local messages.
Any control surface document you create can be freely exchanged between all versions of the application, and we've worked hard to make sure that every aspect of your controller will be rendered and behave exactly the same, no matter what kind of hardware TouchOSC is running on.
We are always working on adding more protocols, input methods and features, if you would like to suggest anything that is missing for your use-case or workflow - please do not hesitate to contact us and let us know. We think of every single suggestion as a vote - if enough votes are cast, we will make it happen!
Please note that a manual for an application as complex as TouchOSC will always be a work in progress, much like the application itself, and we will continually update these pages based on user feedback and application updates - of which there will be many.
So please do check back from time to time for updates and additions to the material presented here.
Hexler Heavy Industries - 2021
Getting Started
No one likes to read manuals, right?
To get you started as quickly as possible, we've compiled brief tutorials for the minimum steps required to set up working MIDI and OSC connections, and an example of how the MIDI mapping of another application would usually work.
These are not meant to be exhaustive instructions on how to set up TouchOSC, but more of a quick start to make use of your new control surface right now.
If you run into trouble with these, or want to know more, please do consult the detailed sections of the manual for each of the respective functions and configuration, and please feel free to contact us if nothing helps or you think something that should be mentioned here is missing.
Getting Started · MIDI
In this short tutorial, we will be setting up the sending of MIDI messages from TouchOSC to another application on the network.
We'll be using the TouchOSC Bridge utility application, to handle sending MIDI messages over the network, as this is a common use-case for control surfaces running on mobile touch-screen devices.
If you want to send MIDI messages between TouchOSC and other applications or ports on the same device or computer, the set-up becomes much more straight forward, and you can skip the steps involving TouchOSC Bridge in this tutorial.
Protokol
We'll be using the Protokol application, our free tool for testing OSC and MIDI connections and messages. This is the same utility we use in-house for testing our applications.
Protokol is available for all the same platforms as TouchOSC and is a free download.

- Download and install any version of Protokol
- Launch the application, switch to the MIDI tab page, and check the checkbox next to Enabled
- Protokol is now waiting for incoming MIDI messages on all available MIDI ports
TouchOSC Bridge
- Download and install TouchOSC Bridge
- Launch the application, a small icon will appear in the menu bar on macOS, or the task tray on Windows
- Protokol should now display the connection of the new MIDI port created by TouchOSC Bridge
TouchOSC
Next we'll configure TouchOSC to send MIDI messages to TouchOSC Bridge and load one of the included example layouts.

- Launch TouchOSC and open the Connections configuration by pressing the button with the chain link icon on the editor toolbar
- Switch to the Bridge tab page
- Enable the checkbox next to Connection 1 and use the Browse button to select the name of the host or device where you launched TouchOSC Bridge
- The Host field should now be filled in

- Switch to the MIDI tab page
- Enable the checkbox next to Connection 1 and use the Browse buttons to select <Bridge 1> for both the Send Port and Receive Port fields.
Now we'll load one of TouchOSC's included example layouts.

- Open the list of included example layouts, depending on your operating system:
- For the desktop version, find the menu at Help > Examples
- For the mobile version, find the example browser at the top of the editor panel on the right, and press the button with the book icon
- Select any one of the first four documents with Mk2 in the name
With the document now loaded, and the connection configured, put TouchOSC into control surface mode by pressing the play button on the editor toolbar, or by using the CTRL/CMD+E keyboard shortcut on desktop platforms.
Send MIDI messages
With both the receiver and sender configured and ready to go, we'll send some MIDI messages.

Move a fader, press a button or interact with any other control on the control surface in TouchOSC and you should see the received MIDI messages being printed in Protokol.
Getting Started · OSC
In this short tutorial, we will be setting up the sending of OSC messages from TouchOSC to another application.
Protokol
We'll be using the Protokol application, our free tool for testing OSC and MIDI connections and messages. This is the same utility we use in-house for testing our applications.
Protokol is available for all the same platforms as TouchOSC and is a free download.

- Download and install any version of Protokol
- Launch the application, switch to the OSC tab page, and check the checkbox next to Enabled
- Protokol is now listening for OSC messages and is also advertising its OSC receiver on the network.
TouchOSC
Next we'll configure TouchOSC to send OSC messages to Protokol and load one of the included example layouts.

- Launch TouchOSC and open the Connections configuration by pressing the button with the chain link icon on the editor toolbar
- Switch to the OSC tab page
- Enable the checkbox next to Connection 1 and use the Browse button to select the name of the host or device where you launched Protokol
- Both Host and Send Port fields should now be filled in
Now we'll load one of TouchOSC's included example layouts.
- Open the list of included example layouts, depending on your operating system:
- For the desktop version, find the menu at Help > Examples
- For the mobile version, find the example browser at the top of the editor panel on the right, and press the button with the book icon
- Select any one of the first four documents with Mk2 in the name
With the document now loaded, and the connection configured, put TouchOSC into control surface mode by pressing the play button on the editor toolbar, or by using the CTRL/CMD+E keyboard shortcut on desktop platforms.
Send OSC messages
With both the receiver and sender configured and ready to go, we'll send some OSC messages.

Move a fader, press a button or interact with any other control on the control surface in TouchOSC and you should see the received OSC messages being printed in Protokol.
Getting Started · Ableton Live
In this short tutorial, we will walk through mapping MIDI messages from TouchOSC to interface elements in Ableton Live.
Even though we are using Ableton Live in this example, other applications can usually be configured in a similar fashion. Please refer to the application's manual, specifically the MIDI mapping / learn section, to find out how you can map MIDI messages to application functions.
Open Ableton Live's Preferences dialog, select the section labelled "MIDI / Sync" and enable the Track and Remote columns for the MIDI Ports labelled TouchOSC Bridge.
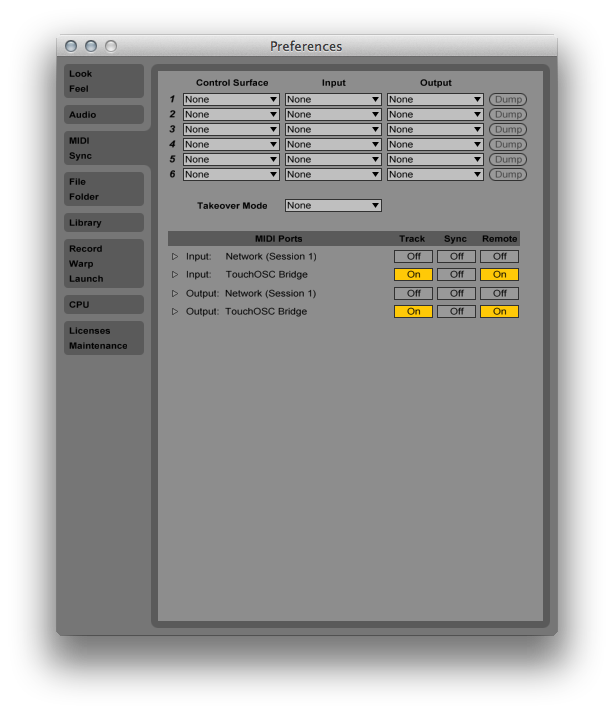
Now Ableton Live is receiving and sending MIDI messages through TouchOSC Bridge. To confirm this, move or press any control in TouchOSC's Simple Mk2 layout (which we loaded in the MIDI tutorial) and you should see the tiny light in the very top-right corner of Ableton Live light up whenever you do so.

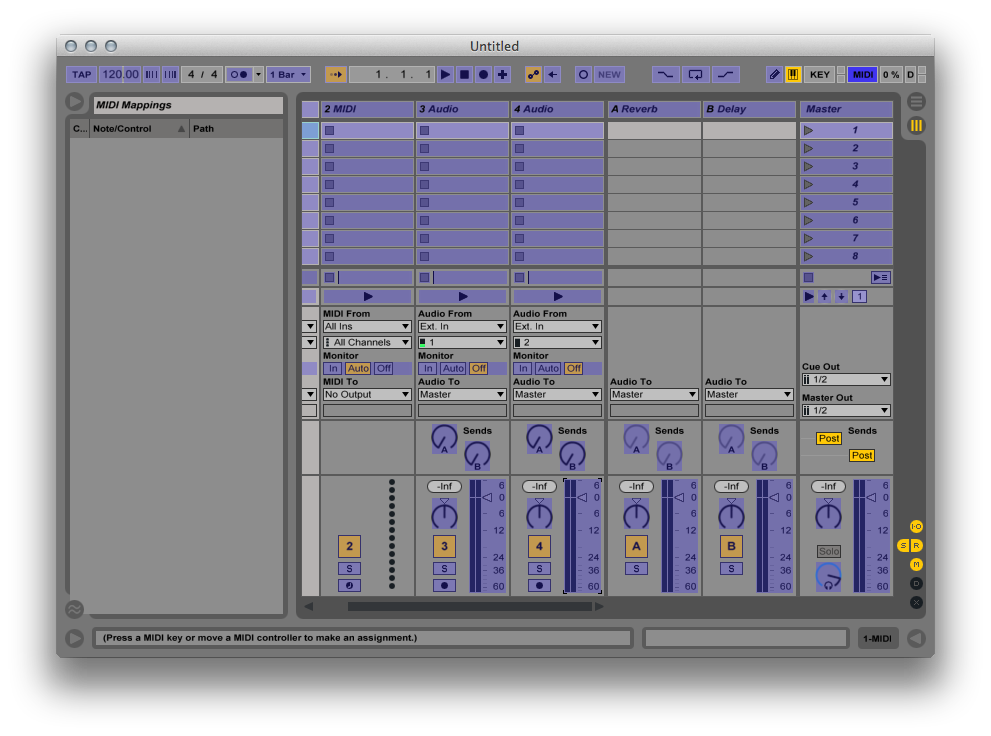
Enter Ableton Live's MIDI Mapping mode by pressing the button labelled MIDI, also in the top-right corner. This will highlight all elements in Live's UI that can be assigned to MIDI controllers with a blue overlay. Select one of these elements, such as one of the Audio-channel's volume faders, and the next MIDI message received by Live will be assigned to this UI element.
Move or press any of the controls in TouchOSC and you will see that Live will add a row to the MIDI Mappings window, and will add another overlay right above the selected UI element displaying details about the MIDI message, such as channel and type.
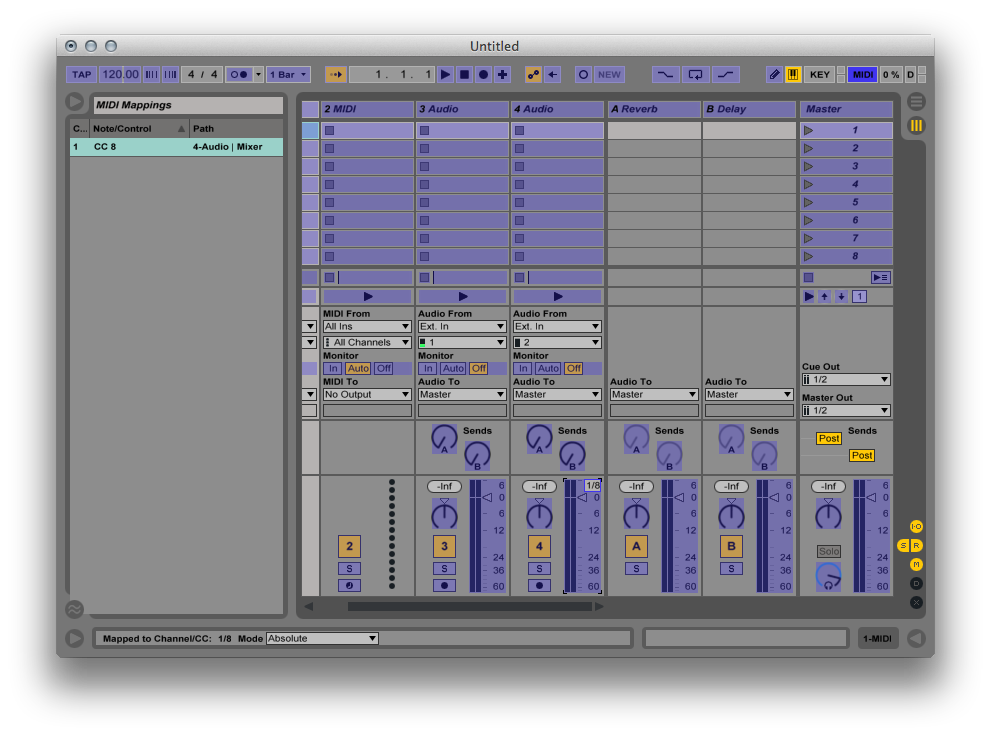
The element is now mapped bi-directionally between TouchOSC and Live. You can now exit Live's MIDI Mapping mode by clicking on the MIDI button in the top-right corner again and start controlling Live with TouchOSC. For more info on configuring Ableton Live please refer to Ableton's official manual.
Editor
TouchOSC comes with a powerful, integrated editor on all platforms, for creating and editing control surface documents.
TouchOSC can open touchosc layout files made for TouchOSC Mk1, and some
aspects of the import can be configured in the preferences.
Documents will be saved in a new tosc document format, specific to this new version, which is not
compatible with the TouchOSC Mk1 application.
Multiple documents can be opened at the same time and all parts of the layout can be copied from one document to another.
Multiple instances of the application can be connected over the network, for synchronized editing and preview on multiple clients in real-time, using the application's Editor Network client-server functionality.
While there a minor differences between the desktop and mobile versions, most functions work identical across all supported platforms, and we'll point out some of the differences in their respective sections.
Editor · Interface
The main interface of TouchOSC can be in one of two modes, Editor and Control Surface mode.
Switch to control surface mode by pressing the play button in the editor Toolbar, and the circle icon button in the control surface to switch back. On desktop platforms the CTRL/CMD+E keyboard shortcut can be used to toggle between both modes.
The position of the circle button in the control surface can be configured in the preferences.
Control Surface Editor
The main control surface editing area is where most editing actions take places.
Right-clicking on an empty area of the document (or long-pressing on mobile platforms) will bring up the Create context menu for adding new controls.

Controls can be selected, either by directly pressing on a control's frame or using a lasso selection by pressing and dragging from an empty area of the document. With controls selected, the panel on the right will display context-sensitive information and properties depending on the type of selection and number of selected controls.
When resizing controls using the handles placed around the edges of the control's frame, on desktop platforms the following modifier keys can be held down to restrict the re-sizing behavior:
- SHIFT - Resize with original aspect-ratio locked
- CONTROL - Resize around the center point of the control
Right-clicking on the selection (or long-pressing on mobile platforms) will bring up the Edit context menu.

When a control is locked, it cannot be selected. A locked control can be unlocked using the document tree view.
Some types of controls are containers for other controls, selecting Edit container from the Edit context menu will descend into the container and display the contents for editing.
To exit editing a container, use the additional Exit container menu item of the Create menu, or double-click outside of the container's frame bounds in the editor.
Panel

The editor panel on the right will display a navigator view of the whole document, the document properties, a hierarchical document tree view of all controls, and, if any controls are currently selected, the control properties, values and messages of the current selection.
All sections of the editor panel can be collapsed and expanded using the section header bar.
On mobile platforms, the top of the panel holds an additional toolbar with functions that would usually be found in the window menu on desktop platforms.

From left to right, the functions are as follows:
- Toggle the editor panel
- Toggle the log view
- Open the message mapping dialog
- Open the font viewer
- Save document
- Open document
- Open an included example layout
- Application preferences and about screen
Toolbar
The editor toolbar holds buttons and menus for various control surface editor functions.

From left to right, the functions are as follows:
- Undo
- Redo
- Copy selection
- Paste clipboard contents
- Delete selection
- Add control
- Edit container - With an editable container control type selected, this function becomes available to edit the container contents.
- Exit container - When editing the contents of an editable container control type, this function becomes available to exit the current container and ascend one level in the document hierarchy.
- Zoom step and numeric input
- Zoom to 1:1
- Zoom to Fit
- Grid, snap and rulers menu
- Switch to control surface view
- Connections configuration
- Editor Network configuration
Log View
The log view provides a way for various systems of the application to print information about the internal state. This can be helpful when troubleshooting problems or for confirming that configured connections or scripts are working correctly.

The log view will display:
- MIDI/OSC: Received and sent MIDI and OSC messages
- LOCAL: Values transmitted using local messages
- GAMEPAD: Received inputs from connected game controllers
- SCRIPT: Script errors and calls to the script
printfunction
The additional buttons in the top right provide the following functions, from left to right:
- Pause the logging of messages
- Display a timestamp for messages
- Insert a marker into the log
- Clear the log
On desktop platforms, it is possible to open the log view in a separate window using an option in the preferences.
Message Mapping
The Message Mapping dialog displays a sortable table of all MIDI, OSC, LOCAL and GAMEPAD messages configured for the current document.
Messages can be sorted by each column in the table by clicking/tapping on the table header and exported to a comma-separated format (CSV) using the Export button.
Double-clicking or tapping any row in the table will close the dialog and select the control that the message is owned by in the control surface editor view.

The columns for each type of message are as follows:
- MIDI
- Control - The control the message is configured for
- Trg. - The value object(s) that will trigger the sending of the message
- Type - The type of the MIDI message
- CH - The channel of the MIDI message
- D1 - The value of the first data byte of the MIDI message
- D2 - The value of the second data byte of the MIDI message (if any)
- Con. - The connections the message is configured to be sent/received on (left to right from first to last connection, 1=enabled, 0=disabled)
- OSC
- Control - The control the message is configured for
- Trg. - The value object(s) that will trigger the sending of the message
- Address - The OSC address of the message
- Arguments - The arguments of the message
- Con. - The connections the message is configured to be sent/received on (left to right from first to last connection, 1=enabled, 0=disabled)
- LOCAL
- Control - The control the message is configured for
- Trg. - The value object(s) that will trigger the sending of the message
- ⊙→ - The source variable of the message
- Target - The target control of the message
- →⊙ - The target variable of the message
- GAMEPAD
- Control - The control the message is configured for
- Input - The game controller input that will trigger the message
- Target - The target value or property of the message
- Con. - The connections the message is configured to be received on (left to right from first to last connection, 1=enabled, 0=disabled)
Font Viewer
The Font Viewer provides a way to browse all characters of the typefaces included with the application.
The application embeds a number of fonts available in all versions for all platforms, to guarantee that any document shared between operating systems and platforms will be rendered exactly the same - without errors or missing symbols.
At the top there is a choice of two styles of typefaces, Default and Monospaced, analogous to the font property of TouchOSC's Label and Text controls.
Clicking or tapping any character in the font viewer will copy that character to the clipboard.

When rendering any character, TouchOSC will search a series of fallback typefaces:
- Default
- Monospaced
Unchecking the Include fallback fonts option will limit the display of characters to the first font in the fallback chain only.
Editor · Document
A document is the top-level container for all controls and the root node of the control hierarchy tree.
A document has properties that define the display size and background color, global routing options for messages and optional notes by the creator.
A document can also have a script attached and define control callback functions, which will be called before any other script callbacks and allow to capture certain events globally before they are forwarded to the target controls. See Object Callback Functions for details.

Width
The width of the document.
Height
The height of the document.
Color
The background color of the document.
Routing

The global routing matrix determines which types of received messages or input will cause any other type of configured messages to be sent or suppressed.
The left column lists all possible types of inputs that can change a control's values. The bottom row lists all possible types of messages that can be sent in response to a control's value changing.
Any event changing a control's value will be tagged with the type of action that caused the value change. When a control's value changes, the application then compiles a list of all enabled messages that are being triggered by this value change. The application will then consult the routing options of the document to determine which of these messages will be sent depending on the type of event that caused the initial value change.
For example: If any control has an enabled MIDI message that will update the control's x value
on reception, and an enabled OSC message that specifies the x value as a trigger, the incoming MIDI
message will only cause the OSC message to be sent if the cross at the intersection between MIDI input in the left
column and OSC output in the bottom row is checked.
Comments

Each document can optionally have creator's name and comments attached to it. The Comments button in the document properties panel will be highlighted if these are not empty.
At the bottom of the dialog, and also in the preferences, there is an option to automatically open the creator's comments after loading the document, if any.
We do encourage users to leave this option enabled, as there might be helpful tips, tricks and guidance attached to a document. Also, in our humble opinion, it's just nice to acknowledge the person sharing their work.
Document Tree

The document tree displays a hierarchical view of all controls in the document.
Controls can be selected and the current selection will be highlighted in the tree structure. For each control the visible and locked properties can be toggled with the eye and lock icons on the right respectively.
Controls that are containers and hence can contain child controls will be displayed as tree nodes that can be expanded and collapsed using the arrow icon to the left of the control name.
Editor · Control
A control is the main object and basic building block for constructing control surfaces.
A control has properties and values that define its appearance and behavior, and controls can have messages and scripts attached to it.
Some control types can be containers for other controls. All controls carry a reference to their parent control, except for the document root container at the very top of the document hierarchy.
See the Control Reference for a complete list of available control types and their properties.
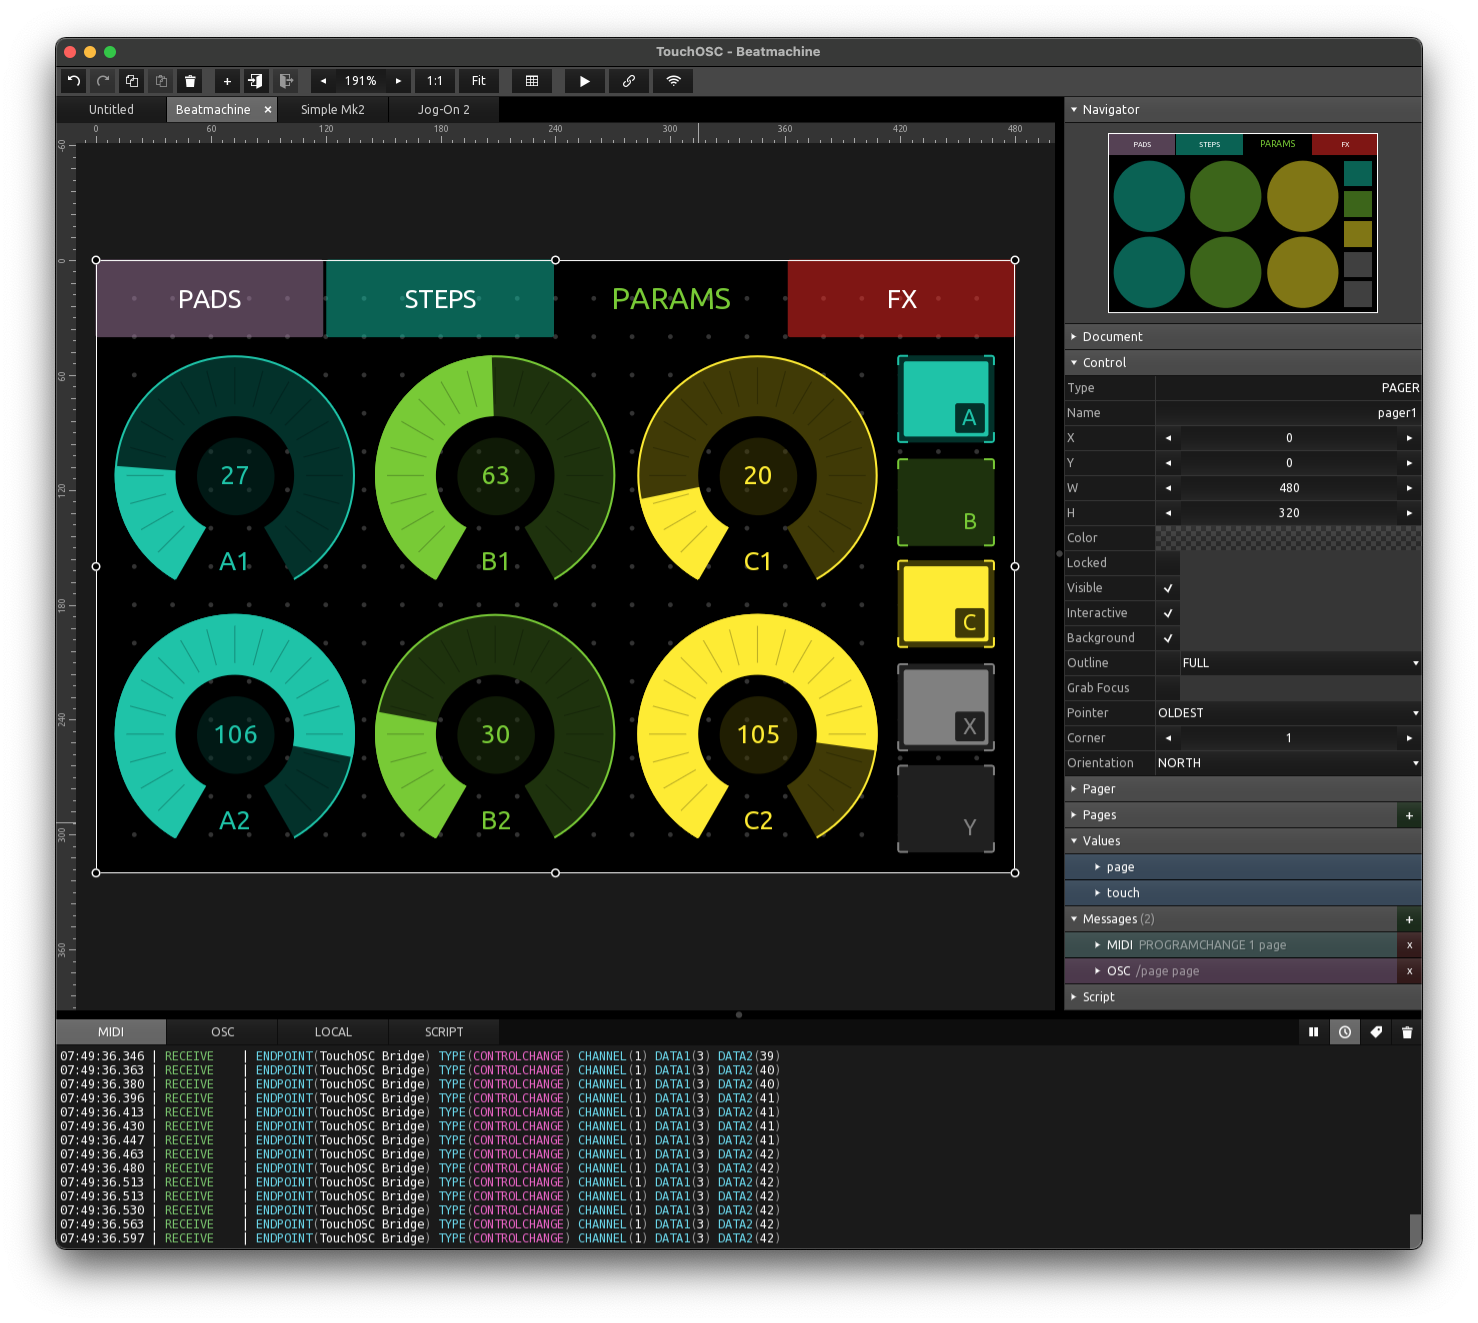
Editor · Control · Properties
All controls have properties that determine appearance and behaviour.
Control properties can be changed in the editor and by messages and scripts.
All controls have a set of common properties and another set of properties specific to their type. Not all control types might use all the common properties or use them in the same way.
For a list of control type specific properties, see the control reference.
- Type
- Name
- Tag
- X, Y, W, H
- Color
- Locked
- Visible
- Interactive
- Background
- Outline
- Grab Focus
- Pointer
- Corner
- Orientation

Type
The type of the control.
See the control reference for all possible types of controls.
Name
The name of the control.
A name string can be freely assigned to a control and does not have to be unique. Use this property to identify controls in messages or scripts.
Tag
A tag for the control.
A tag string can be freely assigned to a control and does not have to be unique. Use this property to identify controls in messages or scripts.
X, Y, W, H
The x and y position and the width and height of the control.
Note: All are integer values.
Color
The color of the control.
Depending on the type of control, this property will be used as a base color from which multiple shades will be generated for different parts of the control.
Locked
The locked state of the control.
When a control is locked, it cannot be selected or otherwise modified in the editor. To unlock a control, right-click (or long-press on mobile) and select Unlock from the context menu.
Visible
The visible state of the control.
If the visible property is set to off, apart from the control not being rendered, it will also not be considered as the target for any pointer interaction, same as if the Interactive property was set to off.
When a control is not visible, it can still be selected in the editor, either directly or by lasso selection, to change the visibility back to on.
Note: The list of pointers currently associated with the control will not be modified when this property changes.
Interactive
The interactive state of the control.
This property determines if the control will be considered when picking the target of a pointer interaction.
Note: The list of pointers currently associated with the control will not be modified when this property changes.
Background
Determines if the control should be rendered with a background.
Outline
Determines if the control should be rendered with an outline and which style of outline.
Possible outline styles are:
- FULL
- CORNERS
- EDGES
Grab Focus
Determines if the control will capture pointers that are interacting with it.
If this property is set to off, a pointer will only be associated with the control for as long as the pointer's position is within the frame of the control and no other control has captured it.
If this property is set to on, the pointer will be added to the list of the control's pointers when it first enters the control's frame, and only be removed when the pointer event ends.
Pointer
Determines which pointer takes priority if there's multiple pointers interacting with the control.
Most types of controls only need one pointer input to determine their behavior, for example a button or a fader-like control. If multiple pointers are associated with the control, this property will determine which of the pointers will be selected as the most significant one - the one that will be used when updating the control's state and values.
Possible values are:
- OLDEST
- NEWEST
Corner
Determines the amount of corner rounding the control will be rendered with.
A value in the range from 0 to 10, with zero indicating no rounded corners.
Orientation
Determines the orientation of the control, which will influence the control's rendering and behavior depending on control type.
Editor · Control · Values
A control can have multiple value objects that are related to a control's internal state.
Values differ from properties in that they can be used as triggers for messages and script callback functions.
A value object can be changed by pointers, messages and scripts. Whenever
any value object changes, the application will invoke the control's onValueChanged script callback
function, if it is defined, and then process all messages that specify the changed value in their list of triggers.
All controls have a Touch value object, the BOOLEAN value of which indicates if there are any pointers currently interacting with the control.

Locked
The locked state of the value object.
If a value is locked it cannot be changed by any pointers, messages or scripts.
Type
The type of the value object.
Possible value types are:
- BOOLEAN
- INTEGER
- FLOAT
- STRING
Default
The default value of this value object.
The value that this value object will hold when the document is loaded initially.
Current
The current value of this value object.
Default Pull
A factor, ranging from 0 to 100 that specifies how strongly the Current value will
be pulled towards the Default value when the control is not currently the target of any pointer.
Note: This value property is currently only available for value objects of type FLOAT.
Default-Current Lock
The lock icon next to the Default and Current value fields can be used to lock both to the same value, meaning if one changes, the other will also change.
Enabling this property will make sure that the value object will be saved with its current value as the default value, which will then be restored when the document is loaded.
Editor · Messages
TouchOSC supports multiple message types to send and receive.
MIDI, OSC and local messages can be sent in response to control value object changes using a message's trigger configuration.
MIDI and OSC messages can be also be sent using script functions and can be received on configured connections.
Messages can be added by pressing the plus button on the right of the message panel header in the editor panel and selecting one of the available message types.
Messages can be removed by pressing the x button on the right of each individual message's panel header and confirming the action.
A control can have an unlimited number of messages configured. Messages will be processed in the order they are listed in the interface, the order of messages can be changed by dragging the message to a new position in the list.

MIDI
A MIDI message to send and receive on one of the configured MIDI connections.
See the section on MIDI message configuration for details.
OSC
An Open Sound Control message to send and receive on one of the configured OSC connections.
See the section on OSC message configuration for details.
Local
A local message to efficiently send messages between controls in a document without the overhead of a communication protocol or need for complex scripting.
See the section on Local message configuration for details.
Gamepad
A gamepad message for receiving inputs from a connected game controller.
See the section on Gamepad message configuration for details.
Editor · Messages · MIDI
A control can have multiple MIDI messages configured. Messages can be both sent and received on multiple connections.
When a message is enabled to send, it will be sent on the configured connections when any of the control's values enabled as trigger change, and if the change matches the change condition of the trigger.
When a message is enabled to receive, it will be considered to be matched against received MIDI messages if the incoming message is received on one of the enabled connections.
Message matching depends on the type of MIDI message. TouchOSC defines part of a MIDI message as the address part, used for routing to determine the target controls, and another part as the payload.
The type of the message and the address part will be used to determine if the incoming message matches the control's message, and the payload part will then be processed to extract values and properties to update (if so configured).
See the message matching section for details on address/payload for each message type.

TEST
Trigger sending of the message manually.
The TEST button will send the message immediately as currently configured.
All message settings will be evaluated except for the Enabled, Send, Receive, Feedback flags and Trigger configuration.
Enabled
The enabled state of the message.
If a message is not enabled, it will neither be sent or matched to received messages.
Send
The send enable flag of the message.
Only if the send flag is set to on for the message, it will be considered for sending when any of the values enabled as triggers change, and the trigger's change condition is met.
Receive
The receive enable flag of the message.
Only if the receive flag is set to on for the message, it will be considered for being matched against any incoming MIDI messages received on any of the connections enabled for the message.
Feedback
The feedback enable flag of the message.
The feedback flag controls the processing of the message in situations where both the send and receive flags are enabled and a received MIDI message changes a value that is also enabled in the list of send triggers for the message.
If a received MIDI message, and subsequent change of value, would also cause the same message to be sent again immediately, this could cause an undesirable feedback loop in the interaction with another application, hence this flag controls if the message should be sent again in this case.
Connections
The connections that the message should be sent and received on. The numbers refer to the numbered MIDI connections configured in the MIDI connections configuration.
If the message is enabled to be sent, it will be sent only on the connections enabled here.
If the message is enabled to be received, any received MIDI messages will only be considered to be matched to this message if received on one of the connections enabled here.
The special connection labelled '∞' enables sending/receiving messages on all connections.
Trigger
The trigger conditions for the message to be sent.
If the message send flag is set to on, it will be sent only if any of the value objects enabled here change, and only if the configured change condition is being met.
Any of the control's values can be enabled individually here, with one of the possible change conditions of:
- ANY - Any change in value will cause the message to be sent
- RISE - Any change causing the value to increase will cause the message to be sent
- FALL - Any change causing the value to decrease will cause the message to be sent
Type
The type of MIDI message.
TouchOSC supports the following types of MIDI messages:
- Note Off/On
- Poly pressure
- Control change
- Program change
- Channel pressure
- Pitch bend
- System exclusive
Depending on the type of message selected, the configuration of the message fields will change. For any of the possible parts of any given MIDI message type, the source value used can be any of:
- CONSTANT
A constant value.
- INDEX
The current index of the control in its parent list of child controls.
- VALUE
The current value of one of the control's value objects.
- PROPERTY
The current value of one of the control's properties.
All values will be converted to integer types, and all source value types except for CONSTANT can optionally be scaled before sending (and in reverse after reception).
Scaling is applied using the following calculation:
out = min + in * (max - min)
Matching
If the receive flag is set to on for a message, it will be considered as the target of any received MIDI message if its configuration matches the incoming message.
The type of message will determine how an incoming message will be matched, and then possibly routed, to be received and processed according to this message's configuration. Only if an incoming message's type and address part match the configured message will it be received and processed according to this message's description.
If the message configuration uses a control value or property for any of the address parts of the message type, the received message has to also match current values of these at the time of reception.
If the message configuration uses a control value or property for the payload part of the message type, the value or property will be updated using the received payload value.
The following table lists the parts of a MIDI message TouchOSC considers address and payload for each of the supported message types:
| Type | Address | Payload |
|---|---|---|
| Note Off/On | Channel + Note | Velocity |
| Poly pressure | Channel + Note | Velocity |
| Control change | Channel + Controller | Value |
| Program change | Channel | Value |
| Channel pressure | Channel | Value |
| Pitch bend | Channel | Value |
Editor · Messages · OSC
A control can have multiple OSC messages configured. Messages can be both sent and received on multiple connections.
When a message is enabled to send, it will be sent on the configured connections when any of the control's values enabled as trigger change, and if the change matches the change condition of the trigger.
When a message is enabled to receive, it will be considered to be matched against received OSC messages if the incoming message is received on one of the enabled connections and the address part matches the received message.

TEST
Trigger sending of the message manually.
The TEST button will send the message immediately as currently configured.
All message settings will be evaluated except for the Enabled, Send, Receive, Feedback flags and Trigger configuration.
Enabled
The enabled state of the message.
If a message is not enabled, it will neither be sent or matched to received messages.
Send
The send enable flag of the message.
Only if the send flag is set to on for the message, it will be considered for sending when any of the values enabled as triggers change, and the trigger's change condition is met.
Receive
The receive enable flag of the message.
Only if the receive flag is set to on for the message, it will be considered for being matched against any incoming OSC messages received on any of the connections enabled for the message.
Feedback
The feedback enable flag of the message.
The feedback flag controls the processing of the message in situations where both the send and receive flags are enabled and a received OSC message changes a value that is also enabled in the list of send triggers for the message.
If a received OSC message, and subsequent change of value, would also cause the same message to be sent again immediately, this could cause an undesirable feedback loop in the interaction with another application, hence this flag controls if the message should be sent again in this case.
The feedback enable flag is set to off by default because of the potential problems this behavior could cause. Please handle with care.
Connections
The connections that the message should be sent and received on. The numbers refer to the numbered OSC connections configured in the OSC connections configuration.
If the message is enabled to be sent, it will be sent only on the connections enabled here.
If the message is enabled to be received, any received OSC messages will only be considered to be matched to this message if received on one of the connections enabled here and the address part matches the received message.
The special connection labelled '∞' enables sending/receiving messages on all configured connections.
Trigger
The trigger conditions for the message to be sent.
If the message send flag is set to on, it will be sent only if any of the value objects enabled here change, and only if the configured change condition is being met.
Any of the control's values can be enabled individually here, with one of the possible change conditions of:
- ANY - Any change in value will cause the message to be sent
- RISE - Any change causing the value to increase will cause the message to be sent
- FALL - Any change causing the value to decrease will cause the message to be sent
Address
The address part of the message.
The address of the message can be configured with a series of partials that will be evaluated to produce the final address string.
The address of the message will be used to match any incoming OSC messages and determine if the received message should be routed to this control.
Arguments
The arguments of the message.
The arguments of the message can be configured with a series of partials, each one representing a single argument to the message.
When sending messages, all argument partials will be evaluated and replaced with the actual value depending on each partial's configuration.
When receiving messages, the received message's arguments will be matched sequentially against the list of partials, and any value objects and properties used in partials will be updated with the received values according to each partial's configuration.
Partials
Partials are the building blocks for constructing OSC message address and argument descriptions. The partials will be evaluated from left to right according to their configuration when producing the actual address and arguments of a message.
Partials can be added to the address and argument lists using the plus button on the right and selecting one of the possible partial types.
A partial can be of the following types:
- CONSTANT
A constant value.
- INDEX
The current index of the control in its parent list of child controls.
- VALUE
The current value of one of the control's value objects.
- PROPERTY
The current value of one of the control's properties.
A partial can be selected and the selected partial can be deleted by pressing the DELETE key on desktop platforms, or right-clicking (long-pressing on mobile platforms) on the partial and confirming the delete in the context menu.
When a partial is selected, more configuration options will be shown depending on type of the partial and if the partial is part of the message address or argument list. Possible options include scaling the value and conversion to one of the following types:
- BOOLEAN
- INTEGER
- FLOAT
- STRING
Scaling is applied using the following calculation:
out = min + in * (max - min)
The order of partials can be changed by dragging a partial to a new position inside the list.
Editor · Messages · Local
A control can have multiple local messages configured. Local messages act like a direct connection between controls to change values and properties locally.
A control can be both the source and target of a local message, for example changing its own color based on the state
of its touch value object.
On desktop platforms, a local connection between controls can be quickly created in the editor by holding down the ALT key and drawing a connection between source and target controls. On all platforms, the target can be picked using the picker icon in the target row.

Enabled
The enabled state of the message.
If a message is not enabled, it will not be sent.
Trigger
The trigger conditions for the message to be sent.
If the message enabled flag is set to on, it will be sent only if any of the value objects enabled here change, and only if the configured change condition is being met.
Any of the control's values can be enabled individually here, with one of the possible change conditions of:
- ANY - Any change in value will cause the message to be sent
- RISE - Any change causing the value to increase will cause the message to be sent
- FALL - Any change causing the value to decrease will cause the message to be sent
Source
The source value to be sent to the target control.
The source value can be one of the following types:
- CONSTANT
A constant value.
- INDEX
The current index of the control in its parent list of child controls.
- VALUE
The current value of one of the control's value objects.
- PROPERTY
The current value of one of the control's properties.
Target
The target value and control of the message.
Enabling target picking mode using the picker icon on the right will assign the next selected control in the editor as the target control of the message. Pressing the picker icon again (or pressing the ESC key on desktop platforms) will cancel target picking mode.
After selecting a target control, the name of the target control will be displayed and clicking on the target control's name will select the control in the editor.
The target value menu will be populated with the available target values. The target value can be one of the following types:
- VALUE
One of the target control's value objects.
- PROPERTY
One of the target control's properties.
Scale
The scaling to apply to the source value.
Scaling is applied using the following calculation:
out = min + in * (max - min)
Conversion
The type conversion to apply to the source value.
The conversion can be one of the following types:
- BOOLEAN
- INTEGER
- FLOAT
- STRING
Editor · Messages · Gamepad
A control can have multiple gamepad messages configured. Gamepad messages can only be received and not sent.
A gamepad message is configured to wait for a certain game controller input on one or multiple configured gamepad connections, and apply the received input value to one of the control's values or properties.
For portability between platforms, and to allow TouchOSC documents to be shared with users using different input devices, all game controllers are mapped to a standard Xbox 360-like controller layout.
This is the same strategy as employed by the ubiquitous Steam game client and the popular SDL2 game development library, and we support the same mapping database format as these.
On desktop platforms, if no mapping can be found for the game controller in the included database, TouchOSC will output a warning to the log view upon connection.
It is possible to update and customize TouchOSC's internal database of controller mappings by placing a text file following SDL2's game controller database format in TouchOSC's configuration directory, found at the following location for each platform:
- Windows:
%AppData%/TouchOSC/ - macOS:
~/Library/Application Support/net.hexler.lex/ - Linux:
~/.TouchOSC/
TouchOSC will look for a file called gamecontrollerdb.txt at this path once at application launch, and if
found, will try to load and apply that configuration.

Enabled
The enabled state of the message.
If a message is not enabled, it will not be processed when a matching input is received.
Connections
The connections that the message should be received on. The numbers refer to the numbered configured game controllers in the Gamepad connections configuration.
The special connection labelled '∞' enables receiving messages on all connections.
Input
The type of input received from the game controller.
The input can be one of the following:
- STICK_LEFT_X
The x-axis of the left analog stick
- STICK_LEFT_Y
the y-axis of the left analog stick
- STICK_RIGHT_X
The x-axis of the right analog stick
- STICK_RIGHT_Y
The y-axis of the right analog stick
- TRIGGER_LEFT
The left trigger at the back of the controller
- TRIGGER_RIGHT
The right trigger at the back of the controller
- BUTTON_UP
The up button on the directional pad
- BUTTON_DOWN
The down button on the directional pad
- BUTTON_LEFT
The left button on the directional pad
- BUTTON_RIGHT
The right button on the directional pad
- BUTTON_A
The face button often labelled A
- BUTTON_B
The face button often labelled B
- BUTTON_X
The face button often labelled X
- BUTTON_Y
The face button often labelled Y
- BUTTON_STICK_LEFT
The button input pressing down on the left analog stick
- BUTTON_STICK_RIGHT
The button input pressing down on the right analog stick
- BUMPER_LEFT
The left bumper button at the back of the controller
- BUMPER_RIGHT
The right bumper button at the back of the controller
- BUTTON_START
The center button often labelled 'Start'
- BUTTON_SELECT
The center button often labelled 'Select' or 'Back'
- BUTTON_HOME
The button at the center of the controller, often showing a logo of the controller manufacturer or game console
Target
The target value or property of the message.
When the configured input is detected on any of the enabled connections, the received numeric value of the input will be written to the target value or property selected here, after scaling and conversion has been applied.
The target can be one of the following types:
- VALUE
One of the target control's value objects.
- PROPERTY
One of the target control's properties.
Scaling
The scaling to apply to the input value.
The input value will be scaled in the same way as other received message values according to the following formula, which is the inverse of the scaling that is applied to outgoing messages of all message types:
value = (input - min) / (max - min)
It's easiest to think of this inverse scaling this way: Setting min and max to the expected
minimum and maximum input values received from the game controller, this transformation will produce a
value ranging from 0 to 1.
Conversion
The type conversion to apply to the input value.
The conversion can be one of the following types:
- BOOLEAN
- INTEGER
- FLOAT
- STRING
Editor · Script
The script editor UI for editing script source code. Please see the Scripting API section of the manual for details about the script language and available functions and objects.

Editor
The text editor for editing script source code with syntax highlighting and limited completion.
Every time the text area looses input focus, the script will be compiled and checked for errors, and if any, the error source line will be highlighted and a short error summary will be displayed in the summary display. For the full error message, open the log view.
The script will not be executed until either switching the editor to control surface mode, or the run button is pressed.
Summary
A short summary of the error message when compiling the script source.
Log
Open the application's log view and show the script messages page.
Run
Execute the current script source code immediately.
As mentioned in the editor section above, the script source is automatically compiled and checked for errors every time the text editor looses input focus, and will be executed the next time switching to control surface mode.
The run button on the other hand will compile and execute the script source immediately, making it possible to use the global section of a script to manipulate controls right in the editor without switching to control surface mode.
Editor · Network
The application's editor network feature allows one instance of the application to act as editor server on the network and lets multiple other instances on the network connect as clients.
The editor server will broadcast the current document and all editor actions to all connected clients in real-time.
The editor clients will be locked into control surface mode and not be able to make any edits while connected to the server. Once disconnected from the server, the document can be edited and saved on the client.
Connected clients will still be able to use the control surface with all messages and scripts fully functional, making it possible to test the configuration of a control surface immediately, while making changes on the server.
NOTE that the current values of a control's value objects are only transmitted once after the initial connect or if explicitly edited on the server, as it would interfere with the ability to test a control surface's functionality and use, if value objects would be continually reset to the current state of the server document while connected.

Client
Manual Connect
Enter an editor server's IP address or host name and port number manually to connect. The pre-filled port number is set to the application's default port number for editor servers.
Available Servers
The list of available servers will be populated with discovered hosts that have the server option enabled.
TouchOSC uses Zero-configuration networking (zeroconf) to discover editor network servers on the local network. If none can be found, please use the Manual Connect option to connect to an editor server.
Discovered editor hosts will be displayed with host name and a connect button to initiate the connection to the selected server.
If an editor server host is reachable via multiple network interfaces or IP addresses, a button will be displayed to expand details about the possible IP addresses to connect to and allow connection via each one individually.
Server
Connections
TouchOSC supports multiple connection types for messages to be sent and received on.
Each type of connection can have up to four or five separate, simultaneous connections configured, each with separate send and receive endpoints.
Each of these numbered connections can be enabled individually in a message's configuration.
MIDI
MIDI connections can be used for sending and receiving messages according to the MIDI 1.0 protocol specification .
We are planning to add support for the MIDI 2.0 protocol specification in the future, once more supporting hardware and software is available.
See the section on MIDI connection configuration for details.
OSC
OSC connections can be used for sending and receiving messages according to the Open Sound Control protocol.
See the section on OSC connection configuration for details.
Bridge
Bridge connections act as virtual MIDI in/out ports that transmit MIDI messages over the network to and from a host on the local network running the TouchOSC Bridge application.
On iOS devices it is also possible to connect to an instance of the TouchOSC Bridge application using a USB cable connection.
Each of these configured connections can then be selected as input and output ports in the MIDI connection configuration.
See the section on Bridge connection configuration for details.
Gamepad
Gamepad connections allow receiving input from connected game controllers.
See the section on Gamepad connection configuration for details.
Connections · MIDI
TouchOSC allows to configure five separate MIDI connections, each with freely assignable input and output ports. Each of these connections can be individually enabled for a control's MIDI messages to be sent and received on.
All enabled TouchOSC Bridge connections can also be configured here as input and output ports just like regular MIDI ports - with TouchOSC transparently handling the transport of MIDI messages over the network via these ports.

Enable
The checkbox at the top left toggles the enabled state of the connection. If a connection is not enabled it will not send or receive any messages.
Expand
The arrow button in the top right toggles the display between editable details of the connection and a short, read-only summary.
Send Port
The name of the MIDI output port to send messages on. This can be any name you enter into the text field or an existing port name found on the system using the Browse function.
If you leave this field empty or no MIDI output port by the specified name is found at runtime, no messages will be sent.
Receive Port
The name of the MIDI input port to receive messages from. This can be any name you enter into the text field or an existing port name found on the system using the Browse function.
If you leave this field empty or no MIDI input port by the specified name is found at runtime, no messages will be received.
Browse
The browse button will list all existing input and output ports currently found on the system, as well as all enabled TouchOSC Bridge connections for selection. Both lists are updated in real-time and will show any ports added while displaying.
Connections · OSC
TouchOSC allows to configure five separate OSC connections, each with freely assignable send destination and receive port. Each of these connections can be individually enabled for a control's configured OSC messages to be sent and received on.
Each connection's receive port can also be advertised on the network using the Zero Configuration Networking (Zeroconf ) standard for other OSC enabled applications and devices to discover.

Enable
The checkbox at the top left toggles the enabled state of the connection. If a connection is not enabled it will not send or receive any messages.
Expand
The arrow button in the top right toggles the display between editable details of the connection and a short, read-only summary.
Type
The type of OSC connection to establish. TouchOSC supports three connection types to transport OSC messages on:
-
UDP
A UDP/IP connection.
The user datagram protocol (UDP) is the most common protocol for communication between OSC enabled applications and devices. If you are unsure which type of connection to choose, it is highly likely that this is the correct one.
-
TCP Client
A TCP/IP client connection to another host.
If the connection to the other host fails for any reason, the connection will automatically attempt to re-connect periodically.
-
TCP Server
A TCP/IP server connection other clients can connect to.
When using one of the TCP/IP connection types, the Framing option will become available to choose one of the following message framing methods:
-
OSC 1.0
TouchOSC will use the simple message framing scheme (size-count-preamble) suggested by the OSC 1.0 specification :
"...the stream should begin with an int32 giving the size of the first packet, followed by the contents of the first packet, followed by the size of the second packet, etc."
-
OSC 1.1
TouchOSC will use the SLIP (RFC1055) with double END character encoding as required by the OSC 1.1 specification .
Host
For the connection types UDP and TCP Client a host name or IP address can be entered as the destination for sent messages. To browse for other applications and devices that advertise their OSC receivers of the selected connection type, use the Browse function.
If you leave this field empty or the destination host is not found at runtime, no messages will be sent.
Send Port
For the connection types UDP and TCP Client a port number can be entered as the destination for sent messages. This field will also be completed when selecting any of the discovered receivers using the Browse function.
If you leave this field empty no messages will be sent.
Receive Port
For the connection types UDP and TCP Server a port number can be entered to listen for received messages or client connections respectively.
If you leave this field empty no messages will be received.
Network Info
The small info icon next to the Receive Port input field will open a dialog listing all IP addresses of all available and active network interfaces of the current machine.
By default all IPv4 and IPv6 addresses are shown, to exclude IPv6 addresses, uncheck the Include IPv6 checkbox.
To refresh the list manually, click the Refresh button to update the list.
Zeroconf
If the Send Port field has a value, the option to advertise the connection's OSC receiver on the network using the Zeroconf standard becomes available with the following options:
-
Disabled
Disables the advertising of the connection's OSC receiver on the network.
-
Default
The application will use the local name of the device for advertising the connection's OSC receiver on the network.
-
Custom
Use a custom service name for advertising the connection's OSC receiver on the network.
-
LogicPad
Emulate TouchOSC Mk1's behaviour for advertising the connection's OSC receiver on the network for use with the included LogicPad layout.
-
LogicTouch
Emulate TouchOSC Mk1's behaviour for advertising the connection's OSC receiver on the network for use with the included LogicTouch layout.
Browse
The browse button next to each connection's Host field will list all OSC receivers compatible with the connection's type found on the network using the Zeroconf standard.
Selecting any of the available results will fill in both the Host and Send Port fields for the connection. In case the discovered OSC receiver is advertised using multiple IP addresses, these will be listed in a sub-menu under the host's name for individual selection.
The list of results is updated in real-time and will show any additional receivers discovered while displaying.
Connections · Bridge
TouchOSC allows to configure five separate connections to connect to instances of the TouchOSC Bridge application.
TouchOSC Bridge acts as a virtual MIDI interface, transparently transmitting MIDI messages to and from another host on the network, or using a USB cable connection on iOS devices.
Each enabled Bridge connection can be individually selected as MIDI input and output port in the MIDI connections configuration.

Enable
The checkbox at the top left toggles the enabled state of the connection. If a connection is not enabled it will not send or receive any messages.
Host
Enter a host name or IP address of the device running TouchOSC Bridge. To browse for available TouchOSC Bridge instances on the network, use the Browse function.
The reserved connection name <USB> can be used on iOS devices to connect to a TouchOSC Bridge instance running on a computer connected using a USB cable.
If you leave this field empty no messages will be sent or received.
Browse
The browse button next to each connection's Host field will list all TouchOSC Bridge instances found on the network.
On iOS devices, an additional <USB> connection will be available to connect to a TouchOSC Bridge instance running on a computer connected using a USB cable.
The list of results is updated in real-time and will show any additional instances discovered while displaying.
Connections · Gamepad
TouchOSC can be configured to receive inputs from four separate, connected game controllers. Each of these connections can be enabled for a control's Gamepad messages to receive input from.

Enable
The checkbox at the top left toggles the enabled state of the connection. If a connection is not enabled it will not receive any input.
Controller
The name of the game controller to receive input from. Choose any of the currently connected game controllers found on the system using the Browse function.
The configured controller can be removed from the connection using the x button.
The configured controller's GUID will be saved to the configuration between application runs or when the selected controller is disconnected and later re-connected.
Browse
The browse button will list all connected game controllers currently found on the system. The list will be updated in real-time and will reflect any controllers added or removed while displaying.
Preferences · General
- User interface scale
- Updates
- Show comments after loading
- Send anonymous usage statistics
- Enable debug logging
User interface scale
Global scaling factor for all of TouchOSC's user interface. Needs a restart of the application to be applied.
Note: This is an experimental feature and maybe cause some user interface controls to behave or render unpredictably.
Updates
Automatically contact the hexler.net website to check for an updated version of the application on startup, at most once a day.
The Channel menu allows for selecting either "Stable" or "Beta" update channels. Please note that beta releases are for previewing upcoming features before a wider release and are subject to change without notice and might not function as expected. Use at your own risk.
Note: No additional information other than the application version, operating system type and architecture will be transmitted to the website during this check.
Show comments after loading
If a document has values for the "Creator" or "Comments" document properties, display these after loading has finished.
Send anonymous usage statistics
This enables sending of anonymous usage statistics back to the hexler.net website.
This may include data about your system and use of the application, such as operating system, version and language, hardware specifics such as amount of RAM and number of CPU cores, type of GPU, graphics API and others.
We use this anonymous data to determine the future direction of the application's design and the viability of continued support for less popular hardware/software configurations. Therefore we strongly recommend leaving this setting enabled to help us make informed decisions about the application's future.
For more information see our Privacy Policy.
Enable debug logging
This will cause the application to log a much larger amount of information about its internal operation.
Note: This will most certainly cause significant overhead and slow down, and is only encouraged when asked to do so by one of our developers or support staff and only while diagnosing a problem.
The Show logs button will open the operating system's file browser at the location of TouchOSC's log files.
Preferences · Editor
Appearance
Show Grid
Toggle the rendering of a grid in the background of the editing surface and configure spacing, appearance and color.
Snap to Grid
Toggle whether controls will snap to the editor grid when being positioned.
Show Rulers
Toggle the rendering of rulers at the top and left edges of the editing surface.
Behaviour
Create default MIDI messages
When creating a new control, automatically create and configure a suitable MIDI message as well.
Create default OSC messages
When creating a new control, automatically create and configure a suitable OSC message as well.
Assign new names on copy/paste
When copy/pasting a control, automatically assign a new name to the control.
Pager navigation only with ALT key
When editing a document, a Pager control's navigation bar is enabled by default and allows to switch between pages as one would when in control surface mode. This option enables this behaviour only when the ALT key is held down at the same time.
Note: This option is only available on desktop platforms.
Script
Font Size
Font size used by the script editor.
Word Wrap
Enables word wrapping in the script editor.
Code Highlighting
Enables colored code highlighting in the script editor.
Code Completion
Enables code completion in the script editor.
Preferences · Control Surface
Display
Orientation
Determine the rotation transformation the control surface will be rendered with.
NORTH is the default and will render the control surface the same as previewed in the editor.
AUTO will cause the orientation to be automatically chosen to maximize the space the control surface will occupy considering the available device screen size and rotation.
NOTE: This setting does not change your device's automatic rotation or rotation lock preferences in any way. Please use your device's native options for these settings in combination with this application setting to achieve the optimal rotation behaviour for your setup.
Filter
The filter selection allows an additional post-processing image filter to be applied to the control surface when rendering.
Allow sleep
Allow the device to sleep when in control surface mode.
The default is to keep the device and display on at all times when in control surface mode.
NOTE: This setting is only available on mobile devices.
Padding
Configure the amount of space to reserve at the top, bottom, left and right edges of the screen when rendering the control surface view.
Back Button
Options related to the back button for exiting the control surface view and returning to the editor view.
Double-tap
Configure the back button to require a double-tap instead of a single press.
Vertical
Configure the vertical alignment of the back button.
Horizontal
Configure the horizontal alignment of the back button.
Preferences · Script
Timeout
In Control Surface mode, long-running scripts will be terminated to prevent the application from stalling.
- SHORT
The default setting, any one script is allowed to take up to ~200ms.
- LONG
For older devices running complex layouts it might be helpful to extend the timeout to ~2000ms. Please use this setting with caution and only if absolutely necessary.
NOTE that in editor mode, the timeout will always be longer than either of these settings to allow for long-running, manually launched scripts to help with editing actions.
Invalid API Usage
When invalid API usage is detected (e.g. accessing non-existent control properties or values, or calling API functions with wrong arguments) the following action will be taken:
- ERROR
If the Log View is active an error message will be printed to the SCRIPT log and the script will be stopped.
- WARN
If the Log View is active a warning message will be printed to the SCRIPT log and the script will continue to execute. If the API call in question expects a return value,
nilwill be returned. - IGNORE
No message will be printed in the SCRIPT log and the script will continue to execute. If the API call in question expects a return value,
nilwill be returned.
Preferences · Log View
Font Size
Font size used by the log view.
Keep log lines
Number of log lines to keep in the scroll-back history.
Note: Setting this option to a large value may drastically impact performance.
Display
Timestamps
Display a timestamp for each logged event.
Control name as path
Display a control's name as path, with all parent container names separated by a forward slash.
Open in separate window
Open the log view in a separate window instead of a split-view embedded in the main application window.
Preferences · Import
Options that apply to the import of touchosc files.
TouchOSC Mk1 defines some OSC messages that are either enabled globally in the application's OSC options or automatically enabled for all controls. To provide backwards compatibility some of the following preferences offer the option to generate these messages automatically on import.
Appearance
Apply Classic Style
This option will configure the properties of all imported controls to closely resemble the look of the original control rendering of the TouchOSC Mk1 app.
Global OSC Messages
Ping
If enabled, will cause a script to be generated at document level to periodically send a /ping OSC
message on all configured OSC connections.
Note: As the globally configured value for the delay of this message can not be read from the TouchOSC Mk1 app's preferences, please see the script source at the document level to manually change this value.
Accelerometer
If enabled, will cause a script to be generated at document level to send a /accxyz OSC message with
three float parameters sampled from the device's accelerometer hardware (if any) on all configured OSC connections
on each update.
Control OSC Messages
Touch
If enabled, will cause a send-only /<control-path>/touch OSC message to be generated that will
send when the control's touch value changes.
Visibility
If enabled, will cause a receive-only /<control-path>/visibility OSC message to be generated that
will apply the received value to the control's visibility property.
Position
If enabled, will cause receive-only /<control-path>/position/x and /<control-path>/position/y
OSC messages to be generated that will apply the received value to the control frame's x and
y properties respectively.
Size
If enabled, will cause receive-only /<control-path>/size/w and
/<control-path>/size/h OSC messages to be generated that will apply the received value to the
control frame's w and h properties respectively.
Color
If enabled, will cause a receive-only /<control-path>/color OSC message and an associated script
to be generated that will apply the received string value to the control's color property. The script
handles the conversion of TouchOSC Mk1's fixed color names to equivalent RGBA color values.
Preferences · MIDI
General
Read NOTE OFF message velocity
If enabled will forward all received NOTE OFF message velocity values unmodified. Otherwise, NOTE OFF message velocity values will be automatically set to zero upon reception.
Virtual Ports
NOTE: These options are currently not available on Android.
Create MIDI input
Controls the creation of a virtual MIDI input port named TouchOSC.
Create MIDI output
Controls the creation of a virtual MIDI output port named TouchOSC.
Control Reference
In this overview we describe all properties and values that are specific to each control type. For a description of common properties and values that all types of controls share, please see Properties and Values.
All properties and values can also be accessed from within scripts. Please see the scripting API's Properties & Values section for information about the field names and types to use for script access.
BOX
A box control is a simple shape with no behavior. It is meant to be efficient to render, for creating decorative elements and backgrounds or to be moved and positioned using messages and script.
Properties
| Name | Description |
| Shape | The shape of the control |
BUTTON
A simple button control with properties to control the press/release behavior. As it uses a FLOAT value for its display, it can be also used as a simple LED display.
Properties
| Name | Description |
| Shape | The shape of the control |
| Type |
The type of button.
|
| Press | Enable the press event for this button. |
| Release | Enable the release event for this button. |
| Value Position | If this property is set to on, the button will use the position of the pointer event to calculate its value. The calculation will take the value of the Orientation property into account. |
Values
| Name | Type | Description |
| x | FLOAT | The amount of "pressure" on the button from fully released to fully pressed. The button will be rendered using this value as alpha value for the color of the button fill. |
LABEL
A single-line text display.
Properties
| Name | Description |
| Font |
The typeface for rendering the text.
|
| Size | The font size. |
| Length | The maximum length of the text. |
| Alignment | Horizontal and vertical alignment of the text inside the control. |
| Color | The text color. |
| Clip | Controls the clipping of the rendered text to the control's frame. Note that disabling this property can significantly improve rendering performance in certain cases. |
Values
| Name | Type | Description |
| text | STRING | The display text. |
TEXT
A multi-line text display.
Properties
| Name | Description |
| Font |
The typeface for rendering the text.
|
| Size | The font size. |
| Alignment | Horizontal and vertical alignment of the text inside the control. |
| Color | The text color. |
| Clip | Controls the clipping of the rendered text to the control's frame. Note that disabling this property can significantly improve rendering performance in certain cases. |
| Wrap | Controls the word wrapping of the rendered text to the control's frame. |
Values
| Name | Type | Description |
| text | STRING | The display text. |
FADER
A fader control.
Properties
| Name | Description |
| Cursor | Show a cursor.
|
| Bar | Show a value bar.
|
| Centered | Render the value bar from the center. |
| Response |
Type of response to pointer input
|
| Factor | Response factor for relative response, in percent of pointer position change. |
| Grid | Render grid lines and the number of grid lines to render. |
| Grid Color | The grid line color. |
Values
| Name | Type | Description |
| x | FLOAT | The value position. |
XY
A two-dimensional fader control.
Properties
| Name | Description |
| Cursor | Show a cursor.
|
| Lines | Show value lines.
|
| Lock X | Lock the x value for pointer input. The value can still be changed through messages and script. |
| Lock Y | Lock the y value for pointer input. The value can still be changed through messages and script. |
| Response |
Type of response to pointer input
|
| Factor | Response factor for relative response, in percent of pointer position change. |
| Grid X | Render horizontal grid lines and the number of grid lines to render. |
| Grid Y | Render vertical grid lines and the number of grid lines to render. |
| Grid Color | The grid line color. |
Values
| Name | Type | Description |
| x | FLOAT | The x value position. |
| y | FLOAT | The y value position. |
RADIAL
A rotary fader control.
Properties
| Name | Description |
| Inverted | Invert the value range. |
| Centered | Display the value from the center of the value range. |
| Response |
Type of response to pointer input
|
| Factor | Response factor for relative response, in percent of pointer position change. |
| Grid | Render grid lines and the number of grid lines to render. |
| Grid Color | The grid line color. |
Values
| Name | Type | Description |
| x | FLOAT | The value position. |
ENCODER
A circular encoder control.
Properties
| Name | Description |
| Cursor | Show a cursor.
|
| Response |
Type of response to pointer input
|
| Factor | Response factor for relative response, in percent of pointer position change. |
| Grid | Render grid lines and the number of grid lines to render. |
| Grid Color | The grid line color. |
Values
| Name | Type | Description |
| x | FLOAT | The value position. |
| y | FLOAT | The direction of change of the value position. |
RADAR
A circular XY control, measuring distance from center and angle.
Properties
| Name | Description |
| Cursor | Show a cursor.
|
| Lines | Show lines for distance and angle.
|
| Lock X | Lock the x value for pointer input. The value can still be changed through messages and script. |
| Lock Y | Lock the y value for pointer input. The value can still be changed through messages and script. |
| Grid X | Render grid lines for distance and the number of grid lines to render. |
| Grid Y | Render grid lines for angle and the number of grid lines to render. |
| Grid Color | The grid line color. |
Values
| Name | Type | Description |
| x | FLOAT | The distance from the center. |
| y | FLOAT | The angle. The calculation will take the value of the Orientation property into account. |
RADIO
A single value selection from a number of discrete values.
Properties
| Name | Description |
| Steps | The number of discrete values. |
| Type | The type of display
|
Values
| Name | Type | Description |
| x | INTEGER | The selected value. |
GROUP
A simple container for child controls. A group will clip the rendering of any contained child controls to its display area.
PAGER
A paged container for child controls. A pager contains a number of group child controls ("pages") and will display only the active one based on its page value. A pager control can be ungrouped to extract the individual page group child controls.
Properties
| Name | Description |
| Bar | Display the pager tab bar. |
| Bar Size | The size of the pager tab bar. |
| Double Tap | Require a double tap on the tab bar instead of a single press to change the active page. |
| Labels | Display the value of each child page's Label property on the tab bar. |
| Text Size | Font size for labels on the tab bar, for both inactive page labels and the active page label. |
Page Properties
| Name | Description |
| Name | The name of the child group control. |
| Label | The text to display on the parent pager's tab bar for this page. |
| Background | The background color of the page group control. |
| Tab Color | The colors to use for the parent pager's tab bar button for this page, for both active and inactive states. |
| Text Color | The colors to use for the parent pager's tab bar button label for this page, for both active and inactive states. |
Values
| Name | Type | Description |
| page | INTEGER | The active page index. |
GRID
A container for a two-dimensional, uniform grid of child controls of the same type. A grid control can be ungrouped to extract the individual child controls. The editor will display the child control type's properties in addition to the grid control's own properties,
Properties
| Name | Description |
| Type | The type of child control. |
| X | The number of columns in the grid. |
| Y | The number of rows in the grid. |
| Start | The corner of the grid to start from when creating the child controls. |
| Order | The direction in which to proceed first in the grid when creating the child controls. |
| Naming | The value to use when assigning the Name property of the created child controls. |
| Exclusive | Whenever a child control's value changes, reset all other child controls' values of the same name back to the default value. |
Setup Examples
Examples, instructions and recipes on how to set up TouchOSC with other applications and hardware.
We'll be adding more of these in the future, so please check back again at a later time.
Getting Started
How-to's
Setup · Android USB MIDI
Beginning with the Android 6.0 (Marshmallow) release, device makers can enable optional MIDI support in the platform.
If your device manufacturer added support for the USB peripheral mode, please follow these steps to enable it and make your device appear as a MIDI device via the USB cable connection, which TouchOSC can then use to send and receive MIDI messages.
Device Setup
While attached to a USB host, pull down from the top of screen and select the entry USB for ... or similar. The exact wording will depend on the customizations applied by your device manufacturer.

From the list of options that appear, select MIDI or similar. Again, the exact wording will depend on the customizations applied by your device manufacturer.

Alternatively these options can also be found in the Android Developer Options at Settings > Developer options > Networking > Select USB Configuration.
TouchOSC Setup
By enabling the USB peripheral mode on your Android device, the OS will also create MIDI input and output ports that TouchOSC can use to send and receive MIDI messages via the USB cable connection.
In TouchOSC's MIDI connection configuration select the newly created Android USB Peripheral Port (or similar) for both the Send Port and Receive Port fields.
Sadly, again, the exact naming of these ports will depend on the customizations applied by your device manufacturer.

Send MIDI messages
We'll use the Protokol application to confirm that the MIDI ports are visible to our USB host and that we can receive MIDI messages sent from TouchOSC.
Protokol is our free tool for testing OSC and MIDI connections and messages. This is the same utility we use in-house for testing our applications.
Launch the Protokol application, switch to the MIDI tab page, and check the checkbox next to Enabled
If all went well, you should see a connected MIDI endpoint in Protokol that is named similarly to your device, and MIDI messages sent from TouchOSC via the USB connection should be received by Protokol.
As you might have guessed, the exact names of the MIDI ports that your device creates depend on the customizations applied by your device manufacturer.

Setup · Resolume Wire
Resolume Wire is a modular node-based patching environment to create effects, mixers and video generators for Resolume Arena & Avenue.
Wire supports both MIDI and OSC control, but as OSC is the more flexible of the two and can be used both locally and over a network, we'll walk through integrating OSC control from TouchOSC into your Wire project.
Enable OSC Input
Open the Wire preferences, switch to the OSC section on the left and enable the OSC Input.

Wire is now listening for incoming OSC messages at the IP Address and Incoming Port number displayed here.
Configure TouchOSC
Open TouchOSC and make sure that you are connected to the same network as the machine that is running Wire.
Open TouchOSC's OSC connection settings.

Make sure Connection 1 is enabled and set to type UDP.
Use the Browse button to search for and select Wire's OSC input on the network and fill in the required values automatically.
If the Wire receiver cannot be found, manually fill in the IP Address displayed in Wire's OSC preferences in the Host field, and the Incoming Port number into the Send Port field.
Close the dialog and open any document configured to send OSC messages, such as the included example layout Simple Mk2.
Switch to control surface mode using the Play button in the toolbar.

Send a few OSC messages from TouchOSC to Wire by using any of the controls in the layout.

In Wire, expand the OSC Input log by pressing the button with the arrow pointing to the right in the top right corner of the OSC preferences.

If everything is working, you should see the OSC messages sent from TouchOSC to Wire appear in the OSC Input log and the basic configuration is complete.
Create OSC nodes
Create a new Wire project and double-click on the empty project's background to open the node search window.
Enter OSC to filter all nodes related to OSC communication.

Select OSC In to create an OSC input node.

Open the node search window again and create a Read OSC node.

Connect the output of the OSC In node to the input of the Read OSC node.

In the Read OSC node's Address field, enter the OSC address that you want to receive.
If you've opened the Simple Mk2 layout in the previous steps, enter /1/fader1.

Open the node search window once again, search for print and create a Print node.

Connect the Param 1 output of the Read OSC node to the input of the Print node.

With this setup, the value of the first parameter of OSC messages with OSC address /1/fader1 sent to Wire
will be printed to the Log.
If you've opened the Simple Mk2 layout in the previous steps, this will be a floating point value ranging from
0.0 to 1.0.
Print OSC messages
With both the setup in TouchOSC and Wire now complete, let's open the Log view in Wire and confirm that the values are being printed.
The Log view in Wire can be found in the Log tab in the panel to the top right of the window.

Send OSC messages from TouchOSC by using the fader control pictured below and you should see the received values printed in the Log view in Wire.
Starting with this basic patch, it should be easy to use the values received from TouchOSC in your own compositions and visual effects.
Happy patching!
Setup · Steam Deck
Follow these steps to download, install and run TouchOSC on the Steam Deck.

Switch to Desktop Mode
Open the Steam Menu using the Steam Button and select Power.

In the following dialog select Switch to Desktop.

The Steam Deck will now switch to Desktop Mode.

Download TouchOSC
Start the Firefox web browser from the task bar at the bottom and navigate to the TouchOSC download section located at https://hexler.net/touchosc#get.

In the Desktop section of the downloads, click the button labelled LINUX.
A pop-up dialog with all available versions for Linux will appear. Click the button labelled ZIP in the section x86 / 64-bit.
The zip file will be downloaded to your Downloads folder.
Open the file browser from the task bar at the bottom (or the downloads menu in Firefox) and select Downloads in the list of Places on the left.

Extract TouchOSC
In the file browser double-click or tap the downloaded zip file and the archiving tool will launch and display the contents of the zip archive.
Select the line that reads TouchOSC and click the Extract button in the top left.

In the dialog that appears there's no need to change anything, just click Extract again to unpack the TouchOSC executable to your Downloads folder.

Launch TouchOSC
Back in the Downloads folder in the file browser there is now a new file named TouchOSC.
Double-click or tap this file.

In the dialog prompting "What do you wish to do with this file?" choose Execute.

The application should launch and the main TouchOSC window should appear - ready for some portable control surface action!

If you are new to TouchOSC please have a look at our Getting Started section.
If you are running into any problems following these steps, please do not hesitate to contact us and let us know!
Setup · Traktor
For the next generation of TouchOSC, Traktor wizard Andrew Norris has created the follow-up to his legendary Jog-On layout.
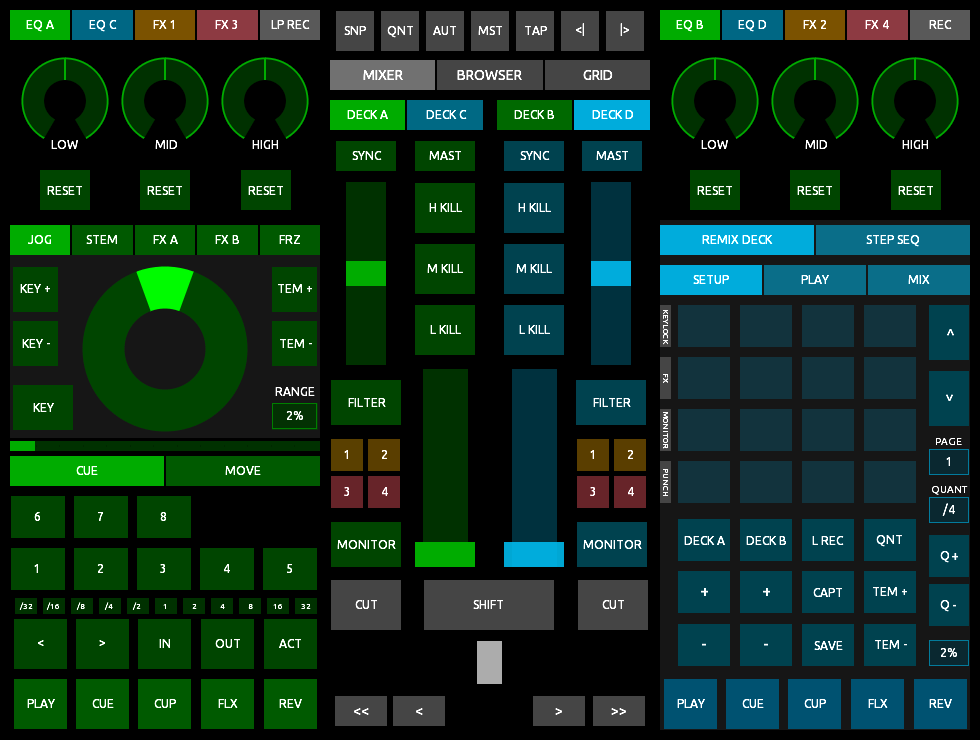
Jog-On 2 is the essential control surface for Native Instruments' Traktor Pro software and is included with TouchOSC and ready to go.
Downloads
Download the detailed manual and Traktor setup file below. The layout itself is included with the application on all platforms.
Updates
v2.1 - 04 Mar 2024
- Stem Decks: volume, filter, or FX sends for all four individual Stem Tracks can now be controlled together without having to switch between pages/tabs.
- Added volume level meters for each individual Stem Track.
- All volume level meters on all Decks now display individual L/R volume levels rather than L/R summed to mono.
- All volume level meters on all Decks now display ‘warning’ colour change when volume level approaches peak.
v2.0 - 06 Jun 2021
- Complete redesign of the original Jog-On layout for TouchOSC.
Videos
A selection of videos by Andrew demonstrating and explaining the inner workings of the layout.
Setup · Logic Pro
Minimum required versions
- Logic Pro 9.1.2 or higher
Note: Make sure your computer and all mobile devices are on the same wireless network.
Adding TouchOSC as Control Surface in Logic
- Start Logic 9.1.2 or higher.
- Start TouchOSC and configure an OSC Connection as follows:
- Enable a connection and set Type to UDP.
- Click the Browse button and select the name of the computer running Logic. The Host and Send Port fields should now be filled in.
- Enter a port number in the Receive Port field (ie 7000).
- Set the Zeroconf option to LogicPad or LogicTouch, depending on which of these two layouts you plan to use.
- Click Done to apply the connections settings.
- Logic will display the following alert:

- Click the Add button. Logic will add the device as a control surface and open the Control Surfaces Setup window.
Note: If you share the wireless network with other Logic systems, you may want to select the Don't show again check-box when adding your last TouchOSC device. This will prevent the dialog from appearing whenever other users start their TouchOSC devices. You can reset this alert suppression by re-enabling New > Automatic Installation in the Control Surfaces Setup window.
Note: If the macOS software firewall is enabled, an alert will come up when sending the first OSC message. You will need to confirm the alert so that Logic can communicate with the OSC device.
Note: It is not possible at this time to use customized Layouts or to learn OSC commands. However, authorized 3rd party developers can create Logic CS plug-ins which can use OSC-based communication.
Scripting API
TouchOSC's scripting API is based on the Lua 5.1 language and virtual machine with custom additions and modifications.
Scripts can be added to all controls in a document and at the document root level. Each control's script will be executed in its own Lua context.
Script · Lua Functions
The following Lua standard library functions are available.
base
Only the following Lua base library functions are available:
error
ipairs
next
pairs
print
select
tonumber
tostring
unpack
type
table
All standard Lua table library functions are available plus the following additions:
table.pack(...)Returns a new sequential table created from the elements provided.
table.unpack(...)Same as the Lua base library function unpack.
math
All standard Lua math library functions are available plus the following additions:
math.clamp(number, number, number)Returns min(max(x, minVal), maxVal) where x is the first parameter and minVal
and maxVal the second and third parameters.
string
All standard Lua string library functions are available.
bit32
Support for bitwise operations has been back-ported from Lua 5.2. All functions are available inside the table bit32.
utf8
Basic support for UTF-8 encoding has been back-ported from Lua 5.3. All functions are available inside the table utf8.
Script · Global Functions
TouchOSC provides the following global functions.
Utility Functions
function getVersion()


-- example
local t = getVersion()
print(table.unpack(t))
> 1 2 5 183 -- major minor patch build
Returns a list containing the application's version as major minor patch
build number values.
function getMillis()


-- example
local n = getMillis()
print(n)
> 576970.847
Returns the number of milliseconds since application start.
function getDate()


-- example
local t = getDate()
print(table.unpack(t))
> 2023 10 31 32400 -- year month day tzd
Returns a list with the current local date's year month day tzd
number values. tzd refers to the timezone differential in seconds.
function getTime()


-- example
local t = getTime()
print(table.unpack(t))
> 10 11 37 893 -- hour minute second millisecond
Returns a list with the current local time's hour minute second millisecond
number values.
function hasAccelerometer()


-- example
local b = hasAccelerometer()
print(b)
> true
Returns true if the host device provides an accelerometer sensor, false otherwise.
function getAccelerometer()


-- example
local t = getAccelerometer()
print(table.unpack(t))
> -8.925 0.134 4.078 -- x y z
Returns a list of three number values that are sampled from the host device's accelerometer sensor. If no accelerometer sensor is available, the values will be all zero.
function hasGyroscope()


-- example
local b = hasGyroscope()
print(b)
> true
Returns true if the host device provides a gyroscope sensor, false otherwise.
function getGyroscope()


-- example
local t = getGyroscope()
print(table.unpack(t))
> -8.925 0.134 4.078 -- x y z
Returns a list of three number values that are sampled from the host device's gyroscope sensor. If no gyroscope sensor is available, the values will be all zero.
function getBatteryLevel()


-- example
local n = getBatteryLevel()
print(n)
> 0.84
Returns the current battery charge level as a number ranging from 0.0 to 1.0 on mobile
devices, 1.0 otherwise.
function bytesToInt(number, number, number, number)


-- example
local i = bytesToInt(0x4D,0x01,0x00,0x00)
print(i)
> 333
Returns a number that is the 32-bit integer representation created from the four byte number parameter values given.
function bytesToFloat(number, number, number, number)


-- example
local f = bytesToFloat(0x00,0x00,0x99,0x42)
print(f)
> 76.5
Returns a number that is the 32-bit floating point representation created from the four byte number parameter values.
Message Functions
TouchOSC provides the following functions to send MIDI and OSC messages.
MIDI Messages
function sendMIDI(table [, table])


-- example
sendMIDI({ 176, 0, 102 })            -- control change
sendMIDI({ 0xF0, 0x00, 0x01, 0xF7 }) -- system exclusive
Send a MIDI message on one or multiple configured connections.
The first argument table is a list of byte values that make up the MIDI message.
Starting with version 1.2.1.171 the function will process byte data for multiple messages and continue
until either the end of the list or an invalid MIDI message is encountered.
The optional second argument table is a list of boolean values that specify which connections to send
the message on. If the argument is omitted, the default is to broadcast the message on all configured connections. If
the table has less than five elements, the omitted elements default to false.
For more usage examples see the Sending MIDI Messages example.
Simple OSC Messages
function sendOSC(string [, ... [, table]])


-- example
sendOSC('/1/fader1', 0.5)
sendOSC('/3/xy1', 0.25, 0.75)
sendOSC('/hello', 'world')
Send an OSC message on one or multiple configured connections.
string is the path of the OSC message to be sent.
The optional argument values ... will be auto-converted to boolean, float or
string OSC types and added to the OSC message as arguments.
Note that argument values are never auto-converted to integer OSC types as scripts do
not treat floating point and integer numbers as separate types. Use the complex OSC
message send function instead.
The optional last argument table is a list of boolean values that specify which connections to send the
message on. If the argument is omitted, the default is to broadcast the message on all configured connections. If the
table has less than five elements, the omitted elements default to false.
For more usage examples see the Sending OSC Messages example.
Complex OSC Messages
function sendOSC(table [, table])


-- example
sendOSC(
  {
    '/complex',
    {
      { tag = 'i', value = 42 },                   -- int
      { tag = 'f', value = 3.14159 },              -- float
      { tag = 's', value = 'Goodbye Cruel World' } -- string
    }
  }
)
Sends an OSC message on one or multiple configured connections.
The first argument table is a list that represents the OSC message to be sent, where the first element
is the path string of the message, and the second element is a list of argument tables with tag and
value keys for each argument:
{
    path,
    {
        { tag = 'argumentTypeTag', value = argumentValue },
        { tag = 'argumentTypeTag', value = argumentValue },
        { tag = 'argumentTypeTag', value = argumentValue },
        ...
    }
}
Each argument value will be converted to an OSC type according to the type tag string
provided:
| Tag | OSC Type |
T |
Boolean true |
F |
Boolean false |
N |
Nil |
I |
Infinitum |
i |
int32 |
h |
int64 |
f |
float32 |
d |
double |
s |
string |
b |
blob |
If the tag key is omitted, the value will be auto-converted the same way as when sending simple OSC messages.
The T F N and I types do not need a value to be specified.
The b OSC blob type expects the value to be a list of byte values making up the blob data.
The optional second argument table is a list of boolean values that specify which connections to send
the message on. If the argument is omitted, the default is to broadcast the message on all configured connections. If
the table has less than five elements, the omitted elements default to false.
For more usage examples see the Sending OSC Messages example.
JSON Functions
TouchOSC provides the following functions to convert Lua tables to and from JSON encoded strings. All JSON functions
are provided inside the global table json.
function json.fromTable(table)


-- example
local t = { a = 123, b = 'hey', c = false, d = json.null }
local str = json.fromTable(t)
Convert a Lua table to a JSON encoded string. The special value json.null can be used to store a null
value in the Lua table.
The input table should either be a sequential list of values, which will be converted to the JSON array
type, or a list of key/value pairs, which will be converted to the JSON object type.
function json.toTable(string)


-- example
local str = '{ "a":123, "b":"hey", "c":false, "d":null }'
local t = json.toTable(str)
Parse a JSON encoded string and return the result as a Lua table. The JSON null value will be written to
the output table as the special value json.null.
Script · Objects
TouchOSC defines the following objects to represent its internal and native types.
Script · Objects · Control
A control object represents a reference to a single control contained within a TouchOSC document.
Using this reference most of a control's properties and values can be
queried and set. From within a control's script, the self reference can be used to refer to the control's
own fields and functions, the root reference (since 1.0.5.109) can be used to refer to the
document's root control.
Each control is assigned a unique ID on creation that remains unchanged during and between application runs, document save/load and editor network transfer.
All controls live in a document tree hierarchy starting at the document root. All controls except for the root have a reference to a parent control, and some control types are containers for child controls.
During compilation each script will be checked for the definitions of any of the callback functions listed below, which serve as the main customization points during the various stages of TouchOSC's processing of an application frame.
Fields
control.ID


-- example
local myID = self.ID
local parentID = self.parent.ID
print(myID == parentID)
> false
A unique ID string, generated when the control is created. It remains unchanged over a control's lifetime, during document load/save and during editor network transmission.
control.type


-- example
local myType = self.type
print(myType == ControlType.BUTTON)
> true
Control type numeric constant, one of the ControlType
enumeration values.
control.index


-- example
local myIndex = self.index
local parentIndex = self.parent.index
The control's position in its parent list of child controls, 1 to n for regular controls, 0
for the document root.
control.parent


-- example
local myParentControl = self.parent
local noParentControl = root.parent -- will be nil, root has no parent
A reference to the control's parent Control object, or nil for the document root.
control.children


-- example
self.children.button1.visible = false -- set 'visible' property on child 'button1'
self.children['button1'].visible = false -- same as the previous line
local firstChild = self.children[1] -- first child control
local secondChild = self.children[2] -- second child control
print(#self.children) -- print the number of child controls
A list of the control's child Control objects. The list can be indexed by control name (a string) or
index (a number). Control names are user assignable and not unique.
| Usage | Description |
|---|---|
control.children.name control.children[name] |
Returns the first child control with name name or nil if none is found. Indexing by
name is equivalent to calling control:findByName(name).
|
control.children[1 to n] |
Returns the child control at index 1 to n or nil if none is found. |
#control.children |
Returns the number of child controls. |
control.properties


-- example
self.properties.name = 'new_name'
self.properties['name'] = 'new_name' -- same as the previous line
self.name = 'new_name' -- same as the previous line
self.frame.x = 10
self.color = Color(1,0,0)
self.color.r = 0
print(#self.properties) -- print the number of properties
A list of the control's properties. The list can be indexed by property name (a string) or index (a number). Property names are unique.
| Usage | Description |
|---|---|
control.properties.name control.properties[name] |
Returns the current value of the property with name name or nil if none is found.
|
control.properties[1 to n] |
Returns the current value of the property at index 1 to n or nil if none is found.
Since version 1.2.6.185 the list is always ordered alphabetically by property name. Earlier versions do not guarantee any particular order. |
control.properties.keys |
Returns a list of all property names for the control in alphabetical order. |
#control.properties |
Returns the number of properties in the list. |
NOTE For convenience, indexing a control reference directly using control.name or
control[name], where name is not one of the field or function names listed here, will implicitly index
the control's property list with control.properties[name].
Therefore control.color and control.properties.color will refer to the same property value.
See Control Properties and Values for a list of possible properties for each control type.
control.values


-- example
self.values.x = 1
self.values['x'] = 1 -- same as the previous line
print(#self.values) -- print the number of values
A list of the control's values. The list can be indexed by value name (a string) or index (a number). Value names are unique.
| Usage | Description |
|---|---|
control.values.name control.values[name] |
Returns the current value of the control value with name name or nil if none is
found.
|
control.values[1 to n] |
Returns the current value of the value at index 1 to n or nil if none is found.
Since version 1.2.6.185 the list is always ordered alphabetically by value name, with the value named |
control.values.keys |
Returns a list of all value names for the control in alphabetical order with the value name touch
always at the end of the list.
|
#control.values |
Returns the number of values in the list. |
See Control Properties and Values for a list of possible values for each control type.
control.messages


-- example
local midiMessages = self.messages.MIDI -- same as: self.messages[1]
local oscMessages = self.messages.OSC -- same as: self.messages[2]
local localMessages = self.messages.LOCAL -- same as: self.messages[3]
local gamepadMessages = self.messages.GAMEPAD -- same: as self.messages[4]
print(#self.messages)
> 4
A list of the control's messages, containing separate lists for each message type. The list can be indexed by
- message type name (a string):
MIDI, OSC, LOCAL, GAMEPAD - index (a number):
1 - 4
The messages in each of the lists will be in the same order as they are displayed in the editor UI.
See Script · Objects · Messages for a description of the four message object types.
control.pointers


-- example
local pointer = self.pointers[1]
print(pointer.ID,
      pointer.x, pointer.y,
      pointer.state,
      pointer.created, pointer.modified)
> 0 33.285 20.393 1 1836924.838 1836914.867
A list containing one table for each pointer currently associated with the control during the current frame with the following table keys per pointer:
| Key | Description |
|---|---|
ID |
The numeric ID of the pointer. Constant during the pointers' lifetime. |
x |
The x position of the pointer. |
y |
The y position of the pointer. |
state |
The current state of the pointer, one of the possible values of the PointerState enumeration.
|
created |
The time the pointer event began, in milliseconds as returned by the getMillis global function.
|
modified |
The time of the last modification of this pointer, in milliseconds as returned by the getMillis global function.
|
Each pointer progresses through the states in the PointerState enumeration during its lifetime:
- After being created the pointer will be in state
PointerState.BEGINfor one frame. - During its lifetime the pointer will be either in state
PointerState.ACTIVEorPointerState.MOVEdepending on whether the pointer's position has changed since the last frame. - When the pointer event ends it will be in state
PointerState.ENDfor one frame and will then be removed from the list of pointers.
See Control Callback Functions for more pointer example use.
Functions
function getValueField(string, field)


-- example
self:getValueField('x', ValueField.CURRENT) -- same as: self.values.x
self:getValueField('x', ValueField.DEFAULT)
Returns a value field of the control value with name string, or nil if none is found.
The parameter field can be one of the possible values of the ValueField enumeration and determines which value is
returned:
ValueField.CURRENT- Returns the current value.ValueField.LAST- Returns the value before the last change.ValueField.DEFAULT- Returns the default value.
Invoking the function with field parameter ValueField.CURRENT is equivalent to referencing
control.values[string].
See Control Properties and Values for a list of possible values for each control type.
function setValueField(string, field, value)


-- example
self:setValueField('x', ValueField.CURRENT, 1.0) -- same as: self.values.x = 1.0
self:setValueField('x', ValueField.DEFAULT, 0.5)
Set a value field of the control value with name string.
The parameter field can be one of the following values of the ValueField enumeration, and determines which value field will
be set:
ValueField.CURRENT- Set the current value.ValueField.DEFAULT- Set the default value.
Invoking the function with field parameter ValueField.CURRENT is equivalent to calling
control.values[string] = value.
function getValueProperty(string, property)


-- example
local valueLocked = self:getValueProperty('x', ValueProperty.LOCKED)
local valueType = self:getValueProperty('x', ValueProperty.TYPE)
print(valueType == ValueType.FLOAT)
> true
Returns the value of the property property of the control value with name string, or nil
if none is found.
The parameter property can be one of the possible values of the ValueProperty enumeration and determines which property
value is returned:
ValueProperty.TYPE- The type of the value, one of the possible values of theValueTypeenumerationValueProperty.LOCKED- Locked state of the value, a boolean valueValueProperty.LOCKED_DEFAULT_CURRENT- Default and current value locked state, a boolean valueValueProperty.DEFAULT_PULL- Default pull of the value, an integer value ranging from0to100
See Control Properties and Values for a list of possible values for each control type.
function setValueProperty(string, property, value)


-- example
self:setValueProperty('x', ValueProperty.LOCKED, false)
self:setValueProperty('x', ValueProperty.DEFAULT_PULL, 50)
Set the value of the property property of the control value with name string.
The parameter property can be one of the possible values of the ValueProperty enumeration with the exception of ValueProperty.TYPE
and determines which property value is set.
See the getValueProperty function above for a description of the possible value properties.
See Control Properties and Values for a list of possible values for each control type.
function notify(string [, value])


-- example
self.parent:notify('hello parent')
self.children.button1:notify('hello child', self.name)
self.children.button2:notify('hello child', 1.5)
Invokes the onReceiveNotify callback function on another control.
The parameter string and an optional parameter value will be copied to the receiving
control's Lua context and passed to the onReceiveNotify
callback function, only if that callback function is defined in the receiving control's script. Calling the function
on self has no effect.
The optional parameter value can be of type boolean, number,
string, table or any of TouchOSC's object types.
Please note that because the parameter values have to be copied between Lua execution contexts and because this
introduces overhead, it is advisable not to invoke the notify function from inside the
update function every frame.
function findByID(string [, boolean])


-- example
local buttonID = self.children.button1.ID
local childButton = self:findByID(buttonID)
Returns the child Control object with ID string or nil if none is found. The
optional boolean parameter determines if the search will be recursive and descend the child control
hierarchy, defaults to false.
function findByType(controltype [, boolean])


-- example
local firstChildButton = self:findByType(ControlType.BUTTON)
local firstChildFader = self:findByType(ControlType.FADER)
Returns the first child Control object whose type matches controltype or nil
if none is found. The controltype parameter can be any of the ControlType
enumeration values. The optional boolean parameter determines if the search will be recursive and descend
the child control hierarchy, defaults to false.
function findAllByType(controltype [, boolean])


-- example
local allChildButtons = self:findAllByType(ControlType.BUTTON)
local allChildFaders = self:findAllByType(ControlType.FADER)
Returns a list of child Control objects whose types match controltype or an empty list if
none are found. The controltype parameter can be any of the ControlType
enumeration values. The optional boolean parameter determines if the search will be recursive and descend
the child control hierarchy, defaults to false.
function findByProperty(string, value [, boolean])


-- example
local firstRedControl = self:findByProperty('color', Color(1,0,0))
local firstHiddenControl = self:findByProperty('visible', false)
Returns the first child Control object whose current value of the property named string
matches the provided value or nil if none is found. The optional boolean
parameter determines if the search will be recursive and descend the child control hierarchy, defaults to
false.
function findAllByProperty(string, value [, boolean])


-- example
local allRedControls = self:findAllByProperty('color', Color(1,0,0))
local allHiddenControls = self:findAllByProperty('visible', false)
Returns a list of child Control objects whose current values of the property named string
matches the provided value or an empty list if none are found. The optional boolean
parameter determines if the search will be recursive and descend the child control hierarchy, defaults to
false.
function findByName(string [, boolean])


-- example
local childButton1 = self:findByName('button1') -- same as: self.children.button1
local childFader1 = self:findByName('fader1') -- same as: self.children.fader1
Equivalent to calling findByProperty('name', string [, boolean]).
function findAllByName(string [, boolean])


-- example
local allChildrenNamedA = self:findAllByName('A')
Equivalent to calling findAllByProperty('name', string [, boolean]).
Callback Functions
If any of the following functions are defined in a control's script, these callback functions are invoked during the various stages of processing of an application frame.
When considering a script function for registration as a callback, the parameter declarations are optional and the function will be called regardless of the parameters being omitted or not.
See Control Callback Functions for example implementations.
function init()


-- example
function init()
  print("init")
end
Called once when the application transitions from editing mode to control surface mode.
Note that this function might be called again under certain conditions:
- When the application comes back to the foreground after being suspended on a mobile device
- When the application is running as editor network client and receives updates from the server that significantly change the structure of the local document
function update()


-- example
function update()
  print("Elapsed ms:", getMillis())
end
Called once per application frame after all processing of user input and received messages has completed.
function onValueChanged(string)


-- example
function onValueChanged(valueName)
  print("Value of ", valueName, "has changed to", self.values[valueName])
end
Called after any of the control's values have changed, once for each changed value, and before any further processing as a result of the change.
The parameter string is the name of the value that has changed. It is valid to set the changed value
again from inside the callback, but note that the callback will not be invoked again as a result.
Returning true from this callback will end any further processing TouchOSC would normally do as a result
of the change (ie sending of messages).
function onPointer(table)


-- example
function onPointer(pointers)
  print('onPointer')
  for i=1,#pointers do
    local pointer = pointers[i]
    print('\t', pointer.ID,
          pointer.x, pointer.y,
          pointer.state,
          pointer.created, pointer.modified)
  end
end
Called after processing of user input is complete and all active pointers (mouse cursor or touch input) have been mapped and assigned to any controls, and before any further processing of the pointer state and internal control behavior in response to the pointer input is evaluated.
Will only be invoked if there are any pointers associated with the control during the current frame.
The table passed as parameter to the callback contains a list of one or more pointers that have been
selected as the significant event input according to the control's configuration and do not necessarily
include all pointers currently associated with the control.
For example, a button type control will commonly only be interested in a single significant
touch input, which will be selected by the application and passed to the control for processing based on the control's
configuration.
To access all pointers currently associated with a control access the control.pointers
field.
Returning true from this callback will end any further processing TouchOSC would normally do for the
current control as a result of the input (ie changing a control's values).
For a description of the pointer table format and pointer states see the control.pointers
field.
function onReceiveMIDI(message, connections)


-- example
function onReceiveMIDI(message, connections)
  print('onReceiveMIDI')
  print('\t message     =', table.unpack(message))
  print('\t connections =', table.unpack(connections))
end
Called after receiving a MIDI message and determining that the control should be a receiver of the message according to the routing table, and before any further evaluation or processing of potential changes to a control's values or properties.
Returning true from this callback will end any further processing TouchOSC would normally do for the
current control as a result of receiving the message (ie changing a control's values or properties).
NOTE If it is defined, the document root's onReceiveMIDI callback function will always
be invoked first, and if true is returned from that callback, processing of the message will end, it will
not be passed along to any other controls in the routing table and no further callbacks will be invoked.
For the format of the message and connections parameters see the sendMIDI
function.
function onReceiveOSC(message, connections)


-- example
function onReceiveOSC(message, connections)
  print('onReceiveOSC')
  local path = message[1]
  local arguments = message[2]
  print('\t path        =', path)
  for i=1,#arguments do
    print('\t argument    =', arguments[i].tag, arguments[i].value)
  end
  print('\t connections =', table.unpack(connections))
end
Called after receiving an OSC message and determining that the control should be a receiver of the message according to the routing table, and before any further evaluation or processing of potential changes to a control's values or properties.
Returning true from this callback will end any further processing TouchOSC would normally do for the
current control as a result of receiving the message (ie changing a control's values or properties).
NOTE If it is defined, the document root's onReceiveOSC callback function will always
be invoked first, and if true is returned from that callback, processing of the message will end, it will
not be passed along to any other controls in the routing table and no further callbacks will be invoked.
For the format of the message and connections parameters see the sendOSC function for complex messages.
function onReceiveGamepad(input, value, connections)


-- example
function onReceiveGamepad(input, value, connections)
  print('onReceiveGamepad')
  print('\t input       =', input) -- one of the GamepadInput enumeration values
  print('\t value       =', value)
  print('\t connections =', table.unpack(connections))
end
Called after receiving input from a connected game controller and determining that the control should be a receiver of the input according to the routing table, and before any further evaluation or processing of potential changes to a control's values or properties.
Returning true from this callback will end any further processing TouchOSC would normally do for the
current control as a result of receiving the input (ie changing a control's values or properties).
NOTE If it is defined, the document root's onReceiveGamepad callback function will
always be invoked first, and if true is returned from that callback, processing of the message will end,
it will not be passed along to any other controls in the routing table and no further callbacks will be invoked.
The first parameter input will be one of the possible values of the GamepadInput enumeration.
The second parameter value will be the raw, numeric value as received by the game controller.
See the Control Callback Functions sample script for an example of how to handle game controller messages.
function onReceiveNotify(string [, value])


-- example
function onReceiveNotify(key, value)
  print('onReceiveNotify')
  print('\t key   =', key)
  print('\t value =', value)
end
Called as a result of the control's notify function being called by
another control.
The parameters string and an optional value will be copied from the calling control's Lua
context to the receiving control's Lua context and passed as parameters to the callback function.
Please note that because the parameter values have to be copied between Lua execution contexts and because this
introduces overhead, it is advisable not to invoke the notify function from inside the
update function every frame.
Script · Objects · Messages
Script objects representing the different types of messages associated with a control.
The objects representing the different message types described here can be accessed via a control's messages field.
MIDIMessage
An object representing a single MIDI message in a control's list of MIDI messages.
Fields
The following fields allow to dynamically configure some of the same properties that are available in the editor UI.
message.enabled


-- example
self.messages.MIDI[1].enabled = false
A boolean value. Enable or disable the message.
message.send


-- example
self.messages.MIDI[1].send = false
A boolean value. Enable or disable the sending of the message.
message.receive


-- example
self.messages.MIDI[1].receive = false
A boolean value. Enable or disable the receiving of the message.
message.feedback


-- example
self.messages.MIDI[1].feedback = false
A boolean value. Enable or disable allowing message feedback (sending) immediately after receiving.
message.connections


-- example
local firstMessage = self.messages.MIDI[1]
firstMessage.connections[1] = false
firstMessage.connections[3] = true
print(#firstMessage.connections)
> 5
A list of boolean values for each of the connections the message should be sent or received on.
This list currently has five entries, but the number is subject to change in a future release and will always be the same number as connections available in the MIDI connection configuration.
Functions
message:trigger()


-- example
self.messages.MIDI[1]:trigger()
Trigger and potentially send the message.
Process the message in the same way as if one of its configured triggers had been set. If both the
Enabled and Send fields of the message are enabled, the message will be sent on its
configured connections.
message:data()


-- example
local message_data = self.messages.MIDI[1]:data()
sendMIDI(message_data) -- send on all connections
sendMIDI(message_data, {true, false, false, false, false}) -- send on first connection
sendMIDI(message_data, self.messages.MIDI[1].connections) -- send on message's configured connections
Return the message data prepared for sending.
Process the message based on its current configuration and return the message data in the format used by the sendMIDI
and onReceiveMIDI functions (ie a list of byte values making up the MIDI message).
Note: The Enabled and Send fields will not be considered.
See Script · Global Functions · MIDI Messages.
OSCMessage
An object representing a single OSC message in a control's list of OSC messages.
Fields
The following fields allow to dynamically configure some of the same properties that are available in the editor UI.
message.enabled


-- example
self.messages.OSC[1].enabled = false
A boolean value. Enable or disable the message.
message.send


-- example
self.messages.OSC[1].send = false
A boolean value. Enable or disable the sending of the message.
message.receive


-- example
self.messages.OSC[1].receive = false
A boolean value. Enable or disable the receiving of the message.
message.feedback


-- example
self.messages.OSC[1].feedback = false
A boolean value. Enable or disable allowing message feedback (sending) immediately after receiving.
message.connections


-- example
local firstMessage = self.messages.OSC[1]
firstMessage.connections[1] = false
firstMessage.connections[3] = true
print(#firstMessage.connections)
> 5
A list of boolean values for each of the connections the message should be sent or received on.
This list currently has five entries, but the number is subject to change in a future release and will always be the same number as connections available in the OSC connection configuration.
Functions
message:trigger()


-- example
self.messages.OSC[1]:trigger()
Trigger and potentially send the message.
Process the message in the same way as if one of its configured triggers had been set. If both the
Enabled and Send fields of the message are enabled, the message will be sent on its
configured connections.
message:data()


-- example
local message_data = self.messages.OSC[1]:data()
sendOSC(message_data) -- send on all connections
sendOSC(message_data, {true, false, false, false, false}) -- send on first connection
sendOSC(message_data, self.messages.OSC[1].connections) -- send on message's configured connections
Return the message data prepared for sending.
Process the message based on its current configuration and return the message data in the format used by the sendOSC
and onReceiveOSC functions.
Note: The Enabled and Send fields will not be considered.
See Script · Global Functions · OSC Messages.
LocalMessage
An object representing a single Local message in a control's list of Local messages.
Fields
The following fields allow to dynamically configure some of the same properties that are available in the editor UI.
message.enabled


-- example
self.messages.LOCAL[1].enabled = false
A boolean value. Enable or disable the message.
See Editor · Messages · Local.
Functions
message:trigger()


-- example
self.messages.LOCAL[1]:trigger()
Trigger and potentially send the message.
Process the message in the same way as if one of its configured triggers had been set. If the Enabled
field of the message is enabled, the message will be sent.
See Editor · Messages · LOCAL.
GamePadMessage
An object representing a single Gamepad message in a control's list of Gamepad messages.
The following fields allow to dynamically configure some of the same properties that are available in the editor UI.
message.enabled


-- example
self.messages.GAMEPAD[1].enabled = false
A boolean value. Enable or disable the message.
See Editor · Messages · Gamepad.
message.connections


-- example
local firstMessage = self.messages.GAMEPAD[1]
firstMessage.connections[1] = false
firstMessage.connections[3] = true
print(#firstMessage.connections)
> 4
A list of boolean values for each of the connections the message received on.
This list currently has four entries, but the number is subject to change in a future release and will always be the same number as connections available in the Gamepad connection configuration.
See Editor · Messages · Gamepad.
Script · Objects · Rectangle
A rectangle object native to TouchOSC. Will be returned and can be passed anywhere a rectangle is required.
Fields
rectangle.xThe x position of the rectangle.
rectangle.yThe y position of the rectangle.
rectangle.wThe width of the rectangle.
rectangle.hThe height of the rectangle.
Constructor Functions
function Rectangle()                               -- [1]
function Rectangle(rectangle)                      -- [2]
function Rectangle(number, number)                 -- [3]
function Rectangle(number, number, number, number) -- [4]
Returns a new rectangle object with
- position and size set to
(0,0). - position and size copied from another
Rectangleobject. - position set to
(0,0)and size set to the two numbers. - position set to the first pair of numbers and size set to the second two numbers.
Functions
function contains(number, number)


-- example
local r = Rectangle(10,10,50,50)
local b = r:contains(20,20)
print(b)
> true
Tests if the point at position (number, number) is contained within the rectangle and returns a boolean
value.
Script · Objects · Color
A color object native to TouchOSC. Will be returned and can be passed anywhere a color is required. Color components
are stored as floating point values ranging from 0.0 to 1.0.
Fields
color.rThe red component of the color.
color.gThe green component of the color.
color.bThe blue component of the color.
color.aThe alpha component of the color.
Constructor Functions
function Color()                               -- [1]
function Color(color)                          -- [2]
function Color(number)                         -- [3]
function Color(number, number)                 -- [4]
function Color(number, number, number)         -- [5]
function Color(number, number, number, number) -- [6]
Returns a new color object with
- all components initialized with
0.0. - all components copied from another
Colorobject. - all components initialized with number.
rgbcomponents initialized with the first number, theacomponent initialized with the second number.rgbcomponents initialized with the three numbers, theacomponent initialized with1.0rgbacomponents initialized with the four numbers provided.
Static functions
function Color.toHexString(color)


-- example
local redColor = Color(1,0,0)
print(Color.toHexString(redColor))
> FF0000FF
Returns a hexadecimal string representation of the color in the format RRGGBBAA.
function Color.fromHexString(string)


-- example
local red = Color.fromHexString('FF0000FF')
local blue = cColor.fromHexString('0000FF')
local grayAlpha = Color.fromHexString('FF80');
local gray = Color.fromHexString('80');
Returns a color object created from the hexadecimal string representation. The string can be in one of the following
formats: RRGGBBAA, RRGGBB, GGAA, GG, with the latter two forms
creating a grayscale color from the GG value.
Operators
-- multiplication
color * color
color * number

-- division
color / color
color / number

-- addition
color + color
color + number

-- subtraction
color - color
color - number
All operators operate component-wise and return a new color object.
Script · Objects · Vectors
TouchOSC provides 2,3 and 4 component vector types as Vec2 Vec3 Vec4 objects.
Fields
vec2.x
vec3.x
vec4.x
The x component of the vector.
vec2.y
vec3.y
vec4.y
The y component of the vector.
vec3.z
vec4.z
The z component of the vector.
vec4.wThe w component of the vector.
Constructor Functions
function Vec2()                                -- [1]
function Vec2(vec2)                            -- [2]
function Vec2(number)                          -- [3]
function Vec2(number, number)                  -- [4]

function Vec3()                                -- [1]
function Vec3(vec3)                            -- [2]
function Vec3(number)                          -- [3]
function Vec3(number, number, number)          -- [4]

function Vec4()                                -- [1]
function Vec4(vec4)                            -- [2]
function Vec4(number)                          -- [3]
function Vec4(number, number, number, number)  -- [4]
Returns a new vector object with
- all components initialized with
0.0. - all components copied from another vector object.
- all components initialized with number.
- each component initialized with the numbers provided.
Functions
function length()


-- example
local v = Vec2(1,0)
local l = v:length()
print(l)
> 1
Returns the length of the vector
function normalize()


-- example
local v = Vec2(1,1)
local n = v:normalize()
Returns a new vector that is the normalized vector
Operators
-- multiplication
vector * vector
vector * number

-- division
vector / vector
vector / number

-- addition
vector + vector
vector + number

-- subtraction
vector - vector
vector - number
All operators operate component-wise and return a new vector object.
Script · Enumerations
- AlignH
- AlignV
- ButtonType
- ControlType
- CursorDisplay
- Font
- GamepadInput
- MIDIMessageType
- Orientation
- OutlineStyle
- PointerPriority
- PointerState
- RadioType
- Response
- Shape
- ValueField
- ValueProperty
- ValueType
AlignH
Possible values for a Control object's textAlignH property.
AlignH.LEFTAlignH.CENTERAlignH.RIGHT
AlignV
Possible values for a Control object's textAlignV property.
AlignV.TOPAlignV.MIDDLEAlignV.BOTTOM
ButtonType
Possible values for a Control object's buttonType property.
ButtonType.MOMENTARYButtonType.TOGGLE_RELEASEButtonType.TOGGLE_PRESS
ControlType
Possible values for a Control object's type field.
ControlType.BOXControlType.BUTTONControlType.LABELControlType.TEXTControlType.FADERControlType.XYControlType.RADIALControlType.ENCODERControlType.RADARControlType.RADIOControlType.GROUPControlType.PAGERControlType.GRID
CursorDisplay
CursorDisplay.ALWAYSCursorDisplay.ACTIVECursorDisplay.INACTIVE
Font
Possible values for a Control object's font property.
Font.DEFAULTFont.MONOSPACED
GamepadInput
GamepadInput.STICK_LEFT_XGamepadInput.STICK_LEFT_YGamepadInput.STICK_RIGHT_XGamepadInput.STICK_RIGHT_YGamepadInput.TRIGGER_LEFTGamepadInput.TRIGGER_RIGHTGamepadInput.BUTTON_UPGamepadInput.BUTTON_DOWNGamepadInput.BUTTON_LEFTGamepadInput.BUTTON_RIGHTGamepadInput.BUTTON_AGamepadInput.BUTTON_BGamepadInput.BUTTON_XGamepadInput.BUTTON_YGamepadInput.BUTTON_STICK_LEFTGamepadInput.BUTTON_STICK_RIGHTGamepadInput.BUMPER_LEFTGamepadInput.BUMPER_RIGHTGamepadInput.BUTTON_STARTGamepadInput.BUTTON_SELECTGamepadInput.BUTTON_HOME
MIDIMessageType
MIDIMessageType.NOTE_OFFMIDIMessageType.NOTE_ONMIDIMessageType.POLYPRESSUREMIDIMessageType.CONTROLCHANGEMIDIMessageType.PROGRAMCHANGEMIDIMessageType.CHANNELPRESSUREMIDIMessageType.PITCHBENDMIDIMessageType.SYSTEMEXCLUSIVEMIDIMessageType.QUARTERFRAMEMIDIMessageType.SONGPOSITIONMIDIMessageType.SONGSELECTMIDIMessageType.CLOCKMIDIMessageType.STARTMIDIMessageType.CONTINUEMIDIMessageType.STOPMIDIMessageType.ACTIVESENSINGMIDIMessageType.SYSTEMRESET
Orientation
Possible values for a Control object's orientation property.
Orientation.NORTHOrientation.EASTOrientation.SOUTHOrientation.WEST
OutlineStyle
Possible values for a Control object's outlineStyle property.
OutlineStyle.FULLOutlineStyle.CORNERSOutlineStyle.EDGES
PointerPriority
PointerPriority.OLDESTPointerPriority.NEWEST
PointerState
PointerState.BEGINPointerState.ACTIVEPointerState.MOVEPointerState.END
RadioType
Possible values for a Control object's radioType property.
RadioType.SELECTRadioType.METER
Response
Possible values for a Control object's response property.
Response.ABSOLUTEResponse.RELATIVE
Shape
Possible values for a Control object's shape property.
Shape.RECTANGLEShape.CIRCLEShape.TRIANGLEShape.DIAMONDShape.PENTAGONShape.HEXAGON
ValueField
ValueField.CURRENTValueField.LASTValueField.DEFAULT
ValueProperty
ValueProperty.TYPEValueProperty.LOCKEDValueProperty.LOCKED_DEFAULT_CURRENTValueProperty.DEFAULT_PULL
ValueType
ValueType.BOOLEANValueType.INTEGERValueType.FLOATValueType.STRING
Script · Constants
Colors
Colors.clearColors.blackColors.whiteColors.redColors.greenColors.blueColors.orangeColors.yellowColors.cyanColors.purpleColors.violetColors.grayColors.darkGrayColors.lightGray
Script · Properties and Values
In this reference we list the names and types of the properties and values for each control type, for access from control scripts.
For a description of the meaning and effects of each property and value, please see the Properties, Values and Control Reference sections.
Common
Properties and values that are common to all controls, independent of their type. Not all control types will utilize the value of these properties.
Properties
| Name | Description | Since |
|---|---|---|
name |
A user-editable string. | |
tag |
A user-editable string. | 1.0.2.98 |
frame |
A Rectangle object. |
|
color |
A Color object. |
|
visible |
A boolean value. | |
interactive |
A boolean value. | |
background |
A boolean value. | |
outline |
A boolean value. | |
outlineStyle |
One of the possible values of the OutlineStyle enumeration. |
|
grabFocus |
A boolean value. | |
pointerPriority |
One of the possible values of the PointerPriority enumeration.
| |
cornerRadius |
An integer number value ranging from 0 to 10 |
|
orientation |
One of the possible values of the Orientation enumeration. |
|
script |
A string value. The control's script source code. |
Values
| Name | Description |
|---|---|
touch |
A boolean value. true if any pointers are associated with the control in the current frame,
false otherwise. For a control to be able to be associated with a pointer, its visible
and interactive properties have to both be true |
BOX
Properties
| Name | Description |
|---|---|
shape |
One of the possible values of the Shape enumeration |
BUTTON
Properties
| Name | Type |
|---|---|
shape |
One of the possible values of the Shape enumeration. |
buttonType |
One of the possible values of the ButtonType enumeration. |
press |
A boolean value. |
release |
A boolean value. |
valuePosition |
A boolean value. |
Values
| Name | Description |
|---|---|
x |
A floating point value ranging from 0.0 to 1.0. |
LABEL
Properties
| Name | Type | Since |
|---|---|---|
font |
One of the possible values of the Font enumeration. |
1.0.4.106 |
textSize |
An integer value. | |
textLength |
An integer value. | |
textAlignH |
One of the possible values of the AlignH enumeration. |
|
textAlignV |
One of the possible values of the AlignV enumeration. |
|
textColor |
A Color object. |
|
textClip |
A boolean value. |
Values
| Name | Description |
|---|---|
text |
A string value. |
TEXT
Properties
| Name | Type | Since |
|---|---|---|
font |
One of the possible values of the Font enumeration. |
1.0.4.106 |
textSize |
An integer value. | |
textAlignH |
One of the possible values of the AlignH enumeration. |
1.0.4.106 |
textAlignV |
One of the possible values of the AlignV enumeration. |
1.2.1.171 |
textColor |
A Color object. |
|
textClip |
A boolean value. | 1.2.1.171 |
textWrap |
A boolean value. | 1.2.1.171 |
Values
| Name | Description |
|---|---|
text |
A string value. |
FADER
Properties
| Name | Type | Since |
|---|---|---|
cursor |
A boolean value. | |
cursorDisplay |
One of the possible values of the CursorDisplay enumeration. |
|
bar |
A boolean value. | |
barDisplay |
One of the possible values of the CursorDisplay enumeration. |
|
centered |
A boolean value. | |
response |
One of the possible values of the Response enumeration. |
|
responseFactor |
An integer value ranging from 1 to 100. |
|
grid |
A boolean value. | |
gridSteps |
An integer value. | |
gridColor |
A Color object. |
1.2.0.166 |
Values
| Name | Description |
|---|---|
x |
A floating point value ranging from 0.0 to 1.0. |
XY
Properties
| Name | Type | Since |
|---|---|---|
cursor |
A boolean value. | |
cursorDisplay |
One of the possible values of the CursorDisplay enumeration. |
|
lines |
A boolean value. | |
linesDisplay |
One of the possible values of the CursorDisplay enumeration. |
|
lockX |
A boolean value. | |
lockY |
A boolean value. | |
response |
One of the possible values of the Response enumeration. |
|
responseFactor |
An integer value ranging from 1 to 100. |
|
gridX |
A boolean value. | |
gridY |
A boolean value. | |
gridStepsX |
An integer value. | |
gridStepsY |
An integer value. | |
gridColor |
A Color object. |
1.2.0.166 |
Values
| Name | Description |
|---|---|
x |
A floating point value ranging from 0.0 to 1.0. |
y |
A floating point value ranging from 0.0 to 1.0. |
RADIAL
Properties
| Name | Type | Since |
|---|---|---|
inverted |
A boolean value. | |
centered |
A boolean value. | |
response |
One of the possible values of the Response enumeration. |
|
responseFactor |
An integer value ranging from 1 to 100. |
|
grid |
A boolean value. | |
gridSteps |
An integer value. | |
gridColor |
A Color object. |
1.2.0.166 |
Values
| Name | Description |
|---|---|
x |
A floating point value ranging from 0.0 to 1.0. |
ENCODER
Properties
| Name | Type | Since |
|---|---|---|
cursor |
A boolean value. | |
cursorDisplay |
One of the possible values of the CursorDisplay enumeration. |
|
response |
One of the possible values of the Response enumeration. |
|
responseFactor |
An integer value ranging from 1 to 100. |
|
grid |
A boolean value. | |
gridSteps |
An integer value. | |
gridColor |
A Color object. |
1.2.0.166 |
Values
| Name | Description |
|---|---|
x |
A floating point value ranging from 0.0 to 1.0. |
y |
A floating point value ranging from 0.0 to 1.0. |
RADAR
Properties
| Name | Type | Since |
|---|---|---|
cursor |
A boolean value. | |
cursorDisplay |
One of the possible values of the CursorDisplay enumeration. |
|
lines |
A boolean value. | |
linesDisplay |
One of the possible values of the CursorDisplay enumeration. |
|
lockX |
A boolean value. | |
lockY |
A boolean value. | |
gridX |
A boolean value. | |
gridY |
A boolean value. | |
gridStepsX |
An integer value. | |
gridStepsY |
An integer value. | |
gridColor |
A Color object. |
1.2.0.166 |
Values
| Name | Description |
|---|---|
x |
A floating point value ranging from 0.0 to 1.0. |
y |
A floating point value ranging from 0.0 to 1.0. |
RADIO
Properties
| Name | Type |
|---|---|
steps |
An integer value. |
radioType |
One of the possible values of the RadioType enumeration. |
Values
| Name | Description |
|---|---|
x |
An integer value ranging from 0 to the value of the steps property minus one. |
PAGER
Properties
| Name | Type |
|---|---|
tabbar |
A boolean value. |
tabbarSize |
An integer value ranging from 10 to 300. |
tabbarDoubleTap |
A boolean value. |
tabLabels |
A boolean value. |
textSizeOff |
An integer value. |
textSizeOn |
An integer value. |
Page Properties
| Name | Type |
|---|---|
tabLabel |
A string value. |
tabColorOff |
A Color object. |
tabColorOn |
A Color object. |
textColorOff |
A Color object. |
textColorOn |
A Color object. |
Values
| Name | Description |
|---|---|
page |
An integer value ranging from 0 to the number of pages minus one. |
Script · Examples
- Control Callback Functions
- Sending MIDI Messages
- Sending OSC Messages
- Control "Double-tap"
- Send Periodic Message
- Send Accelerometer Data
- Snap Fader to Grid
Control Callback Functions
The following script demonstrates all possible callback handlers during TouchOSC's processing of an application frame and all associated events.
As the root level of a document will always be called first if it defines any of the following callback functions
(except for the onReceiveNotify callback), when getting started with the scripting API, we recommend
setting this script at the root level, in order to see all possible events being handled and printed to the log view.
function init()
  print('init')
end

function update()
  print('update')
end

function onPointer(pointers)
  print('onPointer')
  for i=1,#pointers do
    local pointer = pointers[i]
    print('\t', pointer.ID, pointer.x, pointer.y, pointer.state, pointer.created, pointer.modified)
  end
end

function onValueChanged(key)
  print('onValueChanged')
  print('\t', key, '=', self.values[key])
end

function onReceiveMIDI(message, connections)
  print('onReceiveMIDI')
  print('\t message     =', table.unpack(message))
  print('\t connections =', table.unpack(connections))
end

function onReceiveOSC(message, connections)
  print('onReceiveOSC')
  local path = message[1]
  local arguments = message[2]
  print('\t path        =', path)
  for i=1,#arguments do
    print('\t argument    =', arguments[i].tag, arguments[i].value)
  end
  print('\t connections =', table.unpack(connections))
end

function onReceiveGamepad(input, value, connections)
  print('onReceiveGamepad')
  print('\t input       =', input) -- one of the GamepadInput enumeration values
  print('\t value       =', value)
  print('\t connections =', table.unpack(connections))
end

function onReceiveNotify(key, value)
  print('onReceiveNotify')
  print('\t key   =', key)
  print('\t value =', value)
end
Sending MIDI Messages
Send MIDI messages on one or multiple connections.
For more information see the MIDI Messages script documentation.
-- control change, controller 0, channel 1
-- all configured connections (1-5)
sendMIDI({ 176, 0, 102 })
sendMIDI({ MIDIMessageType.CONTROLCHANGE, 0, 102 })

-- control change, controller 0, channel 2
-- all configured connections (1-5)
sendMIDI({ 177, 0, 103 })
sendMIDI({ MIDIMessageType.CONTROLCHANGE + 1, 0, 103 })

-- control change, controller 2, channel 6
-- all configured connections (1-5)
sendMIDI({ 181, 2, 104 })
sendMIDI({ MIDIMessageType.CONTROLCHANGE + 5, 2, 104 })

-- send only on connections 1 and 2
sendMIDI({ MIDIMessageType.NOTE_ON, 12, 88 }, { true, true })
sendMIDI({ MIDIMessageType.NOTE_OFF, 12, 0 }, { true, true })

-- send only on connections 1 and 3
sendMIDI({ MIDIMessageType.NOTE_ON, 13, 88 }, { true, false, true })
sendMIDI({ MIDIMessageType.NOTE_OFF, 13, 0 }, { true, false, true })

-- send only on connections 1 and 5
sendMIDI({ MIDIMessageType.NOTE_ON, 14, 88 }, { true, false, false, false, true })
sendMIDI({ MIDIMessageType.NOTE_OFF, 14, 0 }, { true, false, false, false, true })

-- send system exlusive
sendMIDI({ 0xF0, 0x00, 0x01, 0xF7 })
sendMIDI({ MIDIMessageType.SYSTEMEXCLUSIVE, 0x00, 0x0D, 0xF7 })
Sending OSC Messages
Send OSC messages on one or multiple connections.
Messages can either be sent using a simple format, where TouchOSC will auto-convert parameter types, or using a complex format, where each parameter type can be specified using OSC protocol type-tags.
For more information see the Simple OSC Messages and Complex OSC Messages script documentation.
-- -----------------------------------------
-- Send simple OSC messages
--
-- arguments are auto-converted to
-- boolean, float or string (not integer!)
-- -----------------------------------------

-- send on all configured connections (1-5)
sendOSC('/simple')
sendOSC('/ping', 'pong')
sendOSC('/on', true)
sendOSC('/1/fader1', 0.5)
sendOSC('/3/xy1', 0.25, 0.75)
sendOSC('/mixedarguments', 'Hello', 1, true, 'World')

-- send only on connections 1 and 2
sendOSC('/1/fader1', 0.5, { true, true })

-- send only on connections 1 and 3
sendOSC('/3/xy1', 0.25, 0.75, { true, false, true })

-- send only on connections 1 and 5
sendOSC('/mixedarguments', 'Hello', 1, true, 'World', { true, false, false, false, true })

-- -----------------------------------------
-- Send complex OSC messages
-- with argument type tags
-- -----------------------------------------

sendOSC(
  -- message
  {
    -- path
    '/complex',

    -- argument list
    {
      { tag = 'T' },                                     -- true
      { tag = 'F' },                                     -- false
      { tag = 'N' },                                     -- nil
      { tag = 'I' },                                     -- infinitum
      { tag = 'i', value = 42 },                         -- int32
      { tag = 'h', value = 1337 },                       -- int64
      { tag = 'f', value = 3.14159 },                    -- float32
      { tag = 'd', value = 3.14159265358979 },           -- double
      { tag = 's', value = 'Goodbye Cruel World' },      -- string
      { tag = 'b', value = { 0xC0, 0x00, 0x10, 0xFF } }  -- blob
    }
  },
  -- connections
  {
    true, -- 1
    true, -- 2
    true, -- 3
    true, -- 4
    true  -- 5
  }
)
Control "Double-tap"
Detect a "double-tap" on a control, with a certain maximum time passing between the taps.
local delay = 300 -- the maximum elapsed time between taps
local last = 0

function onValueChanged()
  if(not self.values.touch) then
    local now = getMillis()
    if(now - last < delay) then
      print('double tap!')
      last = 0
    else
      last = now
    end
  end
end
Send a Periodic Message
Repeatedly send an OSC message, in this example once every second.
local delay = 1000 -- every 1000ms = 1s
local last = 0

function update()
  local now = getMillis()
  if(now - last > delay) then
    last = now
    sendOSC('/ping')
  end
end
Send Accelerometer Sensor Data
Read data from the host device's accelerometer sensor (if available) and send as OSC message.
For more information see the documentation for the getAccelerometer utitlity
function.
function update()
  local values = getAccelerometer()
  sendOSC('/accxyz', table.unpack(values))
end
Snap Fader to Grid
Snap a fader's values to the configured grid line interval. Works for any control with a value of type FLOAT and a grid steps property.
function onValueChanged(key)
  if(key ~= 'touch') then
    local steps = self.gridSteps - 1;
    self.values[key] =
      math.floor(steps * self.values[key] + .5) / steps
  end
end